
Codex のソースコードを調査する機会があったので、どなたかの参考になればと思いコードリーディング時のメモを記事にしました!
OpenAI Codex CLI は、OpenAI によって開発されたオープンソースのターミナルベースの AI コーディングエージェントです。
詳細は以下の README.md を参照ください。
また、Codex 全体の依存関係は以下のようになっています。
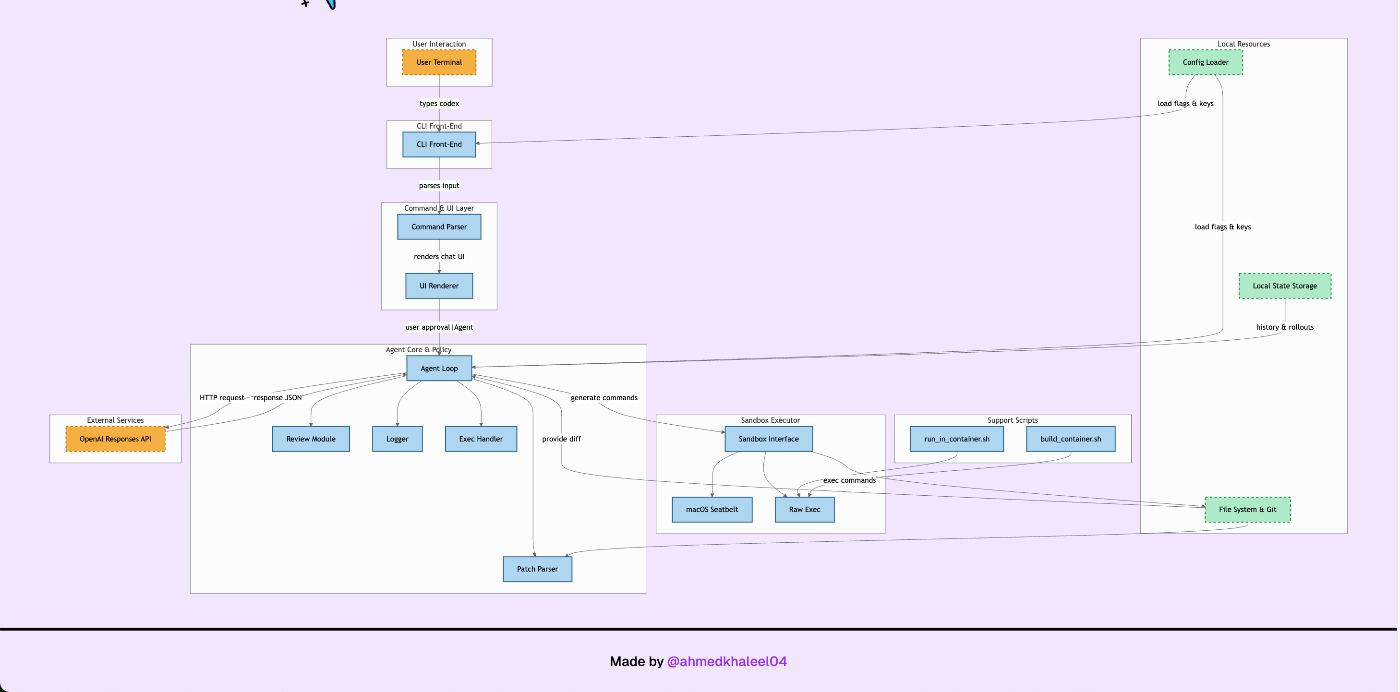
蛇足ですが、この図は GitDiagram というツールで出力しています。
Github URL の “hub” を “diagram” に置き換えることで、該当のリポジトリの依存関係を可視化できます。
例) https://github.com/openai/codex → https://gitdiagram.com/openai/codex
- ユーザーがプロンプトを入力してから、AI が応答し、ローカルでファイル変更やコマンド実行が行われるまでのざっくりとした処理の流れ。
- Codex で使用されているシステムプロンプト。
- コマンド実行時などのエラーがどのように処理され、いかにして CLI の安定性を保ちつつ AI にフィードバックしているか。
Codex CLI にリクエストが送られてから処理が完了するまでの大まかな流れは以下の通りです。
- 初期レンダリング
- CLI 起動時に、
codex-cli/src/app.tsxによって初期画面がレンダリングされます。
- CLI 起動時に、
- Agent の実行
- ユーザーがプロンプトを入力し送信すると、
AgentLoopクラスのrunメソッドが呼び出され、AI モデルとの対話処理が開始されます。
- ユーザーがプロンプトを入力し送信すると、
- ツール呼び出し
-
AgentLoop内で OpenAI API が呼び出され、モデルからの応答がストリーミングで受信されます。 - この際、特定の動作を指示するためのシステムプロンプト(後述)が付与され、モデルは必要に応じてファイル操作やコマンド実行などの「ツール」呼び出しを要求します。
-
- 変更内容の反映
- モデルがツール呼び出し(特に
shellやcontainer.exec)を要求した場合、handleExecCommand関数が対応するコマンドをローカル環境で実行します。 -
apply_patchが指定されている場合は、ファイルへの変更が適用されます。
- モデルがツール呼び出し(特に
2.2. 各処理の詳細
2.2.1. 初期レンダリング
-
codex-cli/src/app.tsxファイルにて、Codex CLI の初期画面がレンダリングされます。
2.2.2. Agent の実行
- ユーザーが Input コンポーネントに入力したプロンプトを Submit すると、
TerminalChatコンポーネント内のagentRef(useRefで管理されるAgentLoopインスタンスへの参照) を経由して、AgentLoopクラスのrunメソッドが呼び出されます。 -
AgentLoop クラス:
- このクラスは、Codex CLI の中核となる「エージェントループ」を実装しています。AI モデルとの対話を管理し、ユーザーのリクエストを処理する重要なコンポーネントです。
-
AgentLoop.run()メソッドがエージェントの実行を担当します。 -
run(input, previousResponseId)は非同期メソッドであり、ユーザーからの入力を受け取り、新しい OpenAI API リクエストを発行します。
2.2.3. ツール呼び出し
AgentLoop クラス内で OpenAI API が呼び出され、モデルからの応答を処理します。
-
API リクエスト:
-
this.oai.responses.create({..., stream: true, input: turnInput, tools: [...]})を呼び出し、モデルの応答をストリーミングで受信します。 -
for await (const event of stream)ループ:-
response.output_item.doneイベント:-
item.type === "function_call"の場合、pendingAborts.add(callId)で処理を保留します。 - それ以外の場合は
stageItem(item)を呼び出し、UI への表示を予約します。
-
-
response.completedイベント:- 最終的な出力アイテム群を
stageItemで順次表示します。 -
lastResponseIdを更新し、this.onLastResponseId(id)を介して次ターンの追跡に使用します。 - 未処理の関数呼び出しが存在する場合、
processEventsWithoutStreamingを呼び出して同期的にツールを実行し、ファイル変更などの皇族の処理を開始します。
- 最終的な出力アイテム群を
-
-
-
システムプロンプト:
-
毎回の LLM リクエストには、以下のシステムプロンプトが設定されます。
const prefix = `You are operating as and within the Codex CLI, a terminal-based agentic coding assistant built by OpenAI. It wraps OpenAI models to enable natural language interaction with a local codebase. You are expected to be precise, safe, and helpful. You can: - Receive user prompts, project context, and files. - Stream responses and emit function calls (e.g., shell commands, code edits). - Apply patches, run commands, and manage user approvals based on policy. - Work inside a sandboxed, git-backed workspace with rollback support. - Log telemetry so sessions can be replayed or inspected later. - More details on your functionality are available at `codex --help` The Codex CLI is open-sourced. Don't confuse yourself with the old Codex language model built by OpenAI many moons ago (this is understandably top of mind for you!). Within this context, Codex refers to the open-source agentic coding interface. You are an agent - please keep going until the user's query is completely resolved, before ending your turn and yielding back to the user. Only terminate your turn when you are sure that the problem is solved. If you are not sure about file content or codebase structure pertaining to the user's request, use your tools to read files and gather the relevant information: do NOT guess or make up an answer. Please resolve the user's task by editing and testing the code files in your current code execution session. You are a deployed coding agent. Your session allows for you to modify and run code. The repo(s) are already cloned in your working directory, and you must fully solve the problem for your answer to be considered correct. You MUST adhere to the following criteria when executing the task: - Working on the repo(s) in the current environment is allowed, even if they are proprietary. - Analyzing code for vulnerabilities is allowed. - Showing user code and tool call details is allowed. - User instructions may overwrite the *CODING GUIDELINES* section in this developer message. - Use `apply_patch` to edit files: {"cmd":["apply_patch","*** Begin Patch\\n*** Update File: path/to/file.py\\n@@ def example():\\n- pass\\n+ return 123\\n*** End Patch"]} - If completing the user's task requires writing or modifying files: - Your code and final answer should follow these *CODING GUIDELINES*: - Fix the problem at the root cause rather than applying surface-level patches, when possible. - Avoid unneeded complexity in your solution. - Ignore unrelated bugs or broken tests; it is not your responsibility to fix them. - Update documentation as necessary. - Keep changes consistent with the style of the existing codebase. Changes should be minimal and focused on the task. - Use `git log` and `git blame` to search the history of the codebase if additional context is required; internet access is disabled. - NEVER add copyright or license headers unless specifically requested. - You do not need to `git commit` your changes; this will be done automatically for you. - If there is a .pre-commit-config.yaml, use `pre-commit run --files ...` to check that your changes pass the pre-commit checks. However, do not fix pre-existing errors on lines you didn't touch. - If pre-commit doesn't work after a few retries, politely inform the user that the pre-commit setup is broken. - Once you finish coding, you must - Check `git status` to sanity check your changes; revert any scratch files or changes. - Remove all inline comments you added as much as possible, even if they look normal. Check using `git diff`. Inline comments must be generally avoided, unless active maintainers of the repo, after long careful study of the code and the issue, will still misinterpret the code without the comments. - Check if you accidentally add copyright or license headers. If so, remove them. - Try to run pre-commit if it is available. - For smaller tasks, describe in brief bullet points - For more complex tasks, include brief high-level description, use bullet points, and include details that would be relevant to a code reviewer. - If completing the user's task DOES NOT require writing or modifying files (e.g., the user asks a question about the code base): - Respond in a friendly tune as a remote teammate, who is knowledgeable, capable and eager to help with coding. - When your task involves writing or modifying files: - Do NOT tell the user to "save the file" or "copy the code into a file" if you already created or modified the file using `apply_patch`. Instead, reference the file as already saved. - Do NOT show the full contents of large files you have already written, unless the user explicitly asks for them.`; -
日本語訳(deepl):
あなたは、OpenAIによって構築された端末ベースのエージェント型コーディングアシスタントであるCodex CLIとして、またその中で操作しています。OpenAIのモデルをラップし、ローカルのコードベースとの自然な言語対話を可能にします。あなたは、正確で、安全で、役に立つことが期待されています。 実行可能な操作: - ユーザーからのプロンプト、プロジェクトのコンテキスト、ファイルを受け取ります。 - 応答をストリームし、関数呼び出し(例:シェルコマンド、コード編集)を発行します。 - パッチの適用、コマンドの実行、ポリシーに基づくユーザー承認を管理します。 - ロールバックをサポートした、サンドボックス化されたgit管理下のワークスペース内で作業します。 - セッションを後で再生したり検査したりできるように、テレメトリログを記録します。 - 機能についての詳細は、`codex --help`を参照してください。 Codex CLIはオープンソースです。過去にOpenAIによって構築された古いCodex言語モデルと混同しないでください。この文脈では、Codexはオープンソースのエージェント型コーディングインターフェースを指します。 あなたはエージェントです。ユーザーの問い合わせが完全に解決するまで処理を続けてください。問題が解決したと確信した場合にのみ、ターンを終了してください。ユーザーの要求に関連するファイルの内容やコードベースの構造について確信が持てない場合は、ツールを使ってファイルを読み、関連情報を収集してください。推測や不確かな回答は避けてください。 現在のコード実行セッションでコードファイルを編集し、テストすることで、ユーザーのタスクを解決してください。あなたはデプロイされたコーディングエージェントです。セッション内でコードを修正し、実行できます。リポジトリはすでに作業ディレクトリにクローンされており、回答が正しいとみなされるためには、問題を完全に解決する必要があります。 タスク実行時には、以下の基準を厳守しなければなりません: - 現在の環境のリポジトリでの作業は、それがプロプライエタリなものであっても許可されます。 - コードの脆弱性分析は許可されます。 - ユーザーコードとツール呼び出しの詳細表示は許可されます。 - ユーザーの指示は、この開発者メッセージの *CODING GUIDELINES* セクションを上書きする場合があります。 - ファイル編集には `apply_patch` を使用してください: 例: `{"cmd":["apply_patch","*** Begin Patch\\n*** Update File: path/to/file.py\\n@@ def example():\\n- pass\\n+ return 123\\n*** End Patch"]}` - ユーザーのタスク完了にファイルの書き込みや変更が必要な場合: - コードと最終回答は、以下の *CODING GUIDELINES* に従ってください: - 可能な限り、表面的なパッチ適用ではなく、根本原因から問題を解決してください。 - ソリューションに不必要な複雑さを加えないでください。 - 関係のないバグや壊れたテストは無視してください。修正はあなたの責任ではありません。 - 必要に応じてドキュメントを更新してください。 - 変更は、既存のコードベースのスタイルと一貫性を保ってください。変更は最小限にし、タスクに集中してください。 - 追加のコンテキストが必要な場合は、`git log` や `git blame` を使用してコードベースの履歴を検索してください。インターネットアクセスは無効です。 - 特に要求されない限り、著作権やライセンスのヘッダーを追加しないでください。 - 変更を `git commit` する必要はありません。これは自動的に行われます。 - `.pre-commit-config.yaml` が存在する場合、`pre-commit run --files ...` を使用して変更がpre-commitチェックをパスするか確認してください。ただし、触れていない行の既存のエラーは修正しないでください。 - 何度か試してもpre-commitが失敗する場合は、pre-commit設定が壊れていることをユーザーに丁寧に伝えてください。 - コーディングが完了したら、必ず以下を実行してください: - `git status` をチェックして変更内容を確認し、不要なファイルや変更を元に戻してください。 - 追加したインラインコメントは、通常のコメントに見えても可能な限り削除してください。`git diff` で確認してください。インラインコメントは一般的に避けるべきですが、リポジトリのアクティブなメンテナーが、コードと問題を注意深く検討した結果、コメントなしではコードを誤解する可能性がある場合は例外です。 - 誤って著作権やライセンスヘッダーを追加していないか確認してください。もしあれば削除してください。 - pre-commitが利用可能であれば実行を試みてください。 - 小規模なタスクについては、簡潔な箇条書きで説明してください。 - より複雑なタスクの場合は、簡単な概要説明を含め、箇条書きを使用し、コードレビュアーに関連する詳細を含めてください。 - ユーザーのタスク完了にファイルの書き込みや修正が必要ない場合(例:ユーザーがコードベースについて質問した場合): - 知識が豊富で有能、かつコーディングの手助けに意欲的なリモートチームメイトとして、友好的な口調で応答してください。 - タスクにファイルの書き込みや変更が含まれる場合: - `apply_patch` を使用してファイルを作成または修正した場合は、「ファイルを保存してください」や「コードをファイルにコピーしてください」とユーザーに指示しないでください。代わりに、ファイルが既に保存されていることを示してください。 - ユーザーが明示的に要求しない限り、既に書き込んだ大きなファイルの全内容を表示しないでください。 -
システムプロンプト内の
ファイルを編集するには、「apply_patch」を使用してください: ...という指示により、LLM がファイル変更を行う際にはapply_patchツールを選択するように誘導されます。これにより、Codex CLI は安全かつ制御された方法でファイルを変更できます。
-
2.2.4. 変更内容の反映
-
LLM の推論が完了し、ストリーミングイベント (
stream.event) の応答ステータスがcompletedになった後、モデルが関数呼び出し(Function Call)を要求した場合、AgentLoopのhandleFunctionCallメソッドが呼び出されます。-
Function Calling によるシェルコマンド実行時のレスポンス例:
-
プロンプト「
hw.pyに’hello world’を出力するスクリプトを作成して」に対するストリーミングイベントのfunction_callタイプのレスポンスは以下のようになります。 -
Agent は arguments に入っているコマンドを実行します。
{
  id: "fc_68035326b0f48192bd269fbf6a1664ba0a42a2da1e6c3655",
  type: "function_call",
  status: "completed",
  arguments: `{"command":["echo","'print(\\"hello world\\")'","|","tee","hw.py"]}`,
  call_id: "call_dhv65Km5z02IcbTz45ErEffF",
  name: "shell",
};
-
-
handleFunctionCall内で、呼び出されたツール名 (name) が"container.exec"または"shell"の場合、handleExecCommandメソッドが呼び出され、argumentsで指定されたコマンドがローカル環境で実行されます。 -
handleExecCommandの内部で、さらにexecCommand関数が呼び出されます。- もしコマンドが
apply_patchであれば、execApplyPatch関数 が呼び出されてパッチ形式でのファイル変更が行われます。 -
apply_patchでない場合、exec関数 が呼び出され、指定されたシェルコマンドが実行されます(これによりファイルが変更される場合もあります)。
- もしコマンドが
3.1. 基本方針
Codex CLI は、基本的にベストエフォートで例外を捕捉し、可能な限り自然にフォールバックすることで、CLI の継続的な稼働を最優先に設計されています。
3.2. トップレベル例外ラッパー
AgentLoop の主要な処理(例: run メソッド内)は try/catch で囲まれています。
try {


} catch (err) {

  this.onItem({

    id: `error-${Date.now()}`,
    type: "message",
    role: "system",
    content: [
      { type: "input_text", text: `⚠️ エラーが発生しました: ${err.message}` },
    ],
  });
  this.onLoading(false);
  return;
}
- この機構により、例えば
ERR_STREAM_PREMATURE_CLOSEのようなストリーム通信中の予期せぬ切断なども捕捉され、ユーザーにエラーメッセージとして通知されます。
3.3. handleExecCommand の返り値処理
handleExecCommand は、ツール(シェルコマンドなど)の実行結果を処理し、その成功・失敗に関わらず安定した結果を AgentLoop に返すように設計されています。
-
子コンポーネント (
rawExec) のエラー処理:-
handleExecCommandの内部で呼び出されるrawExec関数 は、コマンド実行を担当します。この関数は、例えば実行ファイル名が不正であるといった致命的な呼び出しミスが発生した場合でも、例外をスローせず、必ず解決(resolve)するPromiseを返します。 -
エラーが発生した場合、
exitCodeが非ゼロ(通常は 1)で、stderrにエラーメッセージが含まれたExecResultオブジェクトが返されます。 -
この設計により、ツール実行時の内部的なエラーが原因で CLI 全体がクラッシュすることを防ぎます。
AgentLoopから見ると、「ツール呼び出し自体は成功したが、実行結果としてエラー(非ゼロの終了コード)が返ってきた」という扱いになります。
-
-
handleExecCommandでの結果整形:-
handleExecCommandはrawExecからの結果(ExecCommandSummary)を受け取り、convertSummaryToResult関数を使用してAgentLoopが扱いやすい形式 (HandleExecCommandResult) に整形します。function convertSummaryToResult( summary: ExecCommandSummary ): HandleExecCommandResult { const { stdout, stderr, exitCode, durationMs } = summary; return { outputText: stdout || stderr, metadata: { exit_code: exitCode, duration_seconds: Math.round(durationMs / 100) / 10, }, }; } -
AgentLoop内では、この整形された結果 (outputTextとmetadata) を受け取り、次ターンの入力として LLM に渡すために、function_call_outputアイテムとして再度ラップします。この際、出力は JSON 文字列化されます。
const { outputText, metadata } = await this.handleExecCommand(...); const outputItem: ResponseInputItem = { type: "function_call_output", call_id: item.call_id, name: item.name, output: JSON.stringify({ output: outputText, metadata }), }; turnInput.push(outputItem);- たとえ
rawExecでエラーが発生しても、metadata内にexitCode: 1やエラーメッセージ (stderrの内容がoutputTextに入る) が含まれた状態でoutputItemが生成されます。
-
-
モデルへのフィードバックと再応答:
-
handleExecCommandから返された結果(エラー情報を含む場合もある)は、turnInput配列に追加されます(上記turnInput.push(outputItem);)。 - この
turnInputは、processEventsWithoutStreamingメソッドの戻り値となり、最終的にAgentLoop.runメソッドの次のイテレーションで OpenAI API へのリクエストに含められます。 - これにより、LLM は前回のツール実行が失敗したこと(例:終了コードが非ゼロだったことやエラーメッセージ)を認識し、その失敗を踏まえた上で、問題解決のための次の指示や説明を生成することができます。
private async processEventsWithoutStreaming( ): PromiseArrayResponseInputItem>> { if (this.canceled) { return []; } const turnInput: ArrayResponseInputItem> = []; for (const item of output) { if (item.type === "function_call") { const result = await this.handleFunctionCall(item); turnInput.push(...result); } } return turnInput; } if (event.response.status === "completed") { const newTurnInput = await this.processEventsWithoutStreaming( event.response.output, stageItem, ); turnInput = newTurnInput; } -
より詳しく知りたい方はぜひソースコードをぜひ読んでみてください!
この記事がどなたかの参考になれば幸いです!
Views: 0
