
「WPFアプリの操作内容を異なるPC間でリアルタイムで共有したい」と考えていたところ、MagicOnionで実装するのが実装しやすそう&楽しそうと感じた為、「MagicOnion + WPF」で該当の動作を確認する簡単なアプリを作成してみました。
作成にあたり、MagicOnionのサンプルコードにあるチャットアプリを参考にさせてもらっています。また、実行環境としてDockerコンテナーを使用していますが、DockerfileはVisualStudio側で自動生成されるものを基本として、必要な部分だけ調整し使用しています。
色々と知識が不足している状態で作成しておりますので、間違っている部分などご指摘いただけると幸いです。
- Visual StudioでMagicOnionサーバー、WPFアプリを作成
- 作成したMagicOnionサーバーをDockerDesktopで起動
- 同一ネットワークにて、WPFアプリを複数のPCで起動
- 各WPFアプリはMagicOnionサーバーへ自端末での操作内容を送る
- 各WPFアプリはMagicOnionサーバーより各端末の操作内容を受け取る
(イメージ)
以下の環境で実行します。
- .NET9
- Visual Studio Comunity
- Docker Desktop
もしDocker Desktopがインストールされていない場合は、先にインストールしてください。
ソリューションの構成は以下の通りです。
| プロジェクト名 | プロジェクトテンプレート | 説明 |
|---|---|---|
| InteractionShare.Shared | クラスライブラリ | Server – Clientの通信用インターフェイス、MessagePackObjects |
| InteractionShare.Server | ASP.NET Core gRPC サービス | MagicOnionServer |
| InteractionShare.App | WPFアプリケーション | Client用WPFアプリ |
InteractionShare.Shared
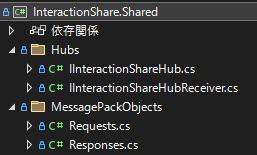
最初にServer-Client間で使用する「InteractionShare.Shared」を作成します。新しいプロジェクトの作成にて「クラスライブラリ」を選択し作成します。
プロジェクトを作成したら、NuGetにて「MagicOnion.Abstractions」「MessagePack」をインストールします。
パッケージのインストールが完了したら、MessagePackObjectから作成していきます。
Join時のリクエスト内容
MessagePackObjects/Requests.cs
using MessagePack;

namespace InteractionShare.Shared.MessagePackObjects
{
    [MessagePackObject]
    public struct JoinRequest
    {
        [Key(0)]
        public string RoomName { get; set; }

        [Key(1)]
        public string UserName { get; set; }
    }
}
操作内容のレスポンス
MessagePackObjects/Responses.cs
using MessagePack;

namespace InteractionShare.Shared.MessagePackObjects
{
    [MessagePackObject]
    public struct StatusResponce
    {
        [Key(0)]
        public string UserName { get; set; }
        [Key(1)]
        public string WindowName { get; set; }
        [Key(2)]
        public string FunctionName { get; set; }
    }
}
続いて、APIのインターフェイスを作成します。
Client -> Server API
Hubs/IInteractionShareHub.cs
using InteractionShare.Shared.MessagePackObjects;
using MagicOnion;

namespace InteractionShare.Shared.Hubs
{
Server -> Client API
Hubs/IInteractionShareHubReceiver.cs
using InteractionShare.Shared.MessagePackObjects;

namespace InteractionShare.Shared.Hubs
{
以上でInteractionShare.Sharedの作成は完了です。
InteractionShare.Server

次に、MagicOnionServerとなる「InteractionShare.Server」を作成します。新しいプロジェクトの作成にて「ASP.NET Core gRPC サービス」を選択します。
プロジェクトを作成したら、デフォルトで「Protos/greet.proto」「Services/GreeterService.cs」が作成されますが、これらは使用しないため削除します。
NuGetにて「MagicOnion.Server」をインストールします。
プロジェクトの参照の追加で、先に作成した「InteractionShare.Shared」を追加します。
MagicOnionServer
既存のProgram.csを以下の様に書き換えます。
Program.cs
using Microsoft.AspNetCore.Server.Kestrel.Core;

var builder = WebApplication.CreateBuilder(args);
builder.WebHost.ConfigureKestrel(options =>
{
    options.ConfigureEndpointDefaults(endpointOptions =>
    {
        endpointOptions.Protocols = HttpProtocols.Http2;
    });
});
builder.Services.AddMagicOnion();

var app = builder.Build();
app.MapMagicOnionService();

app.Run();
続いて、実際のサーバーの処理を作成します。
InteractionShareHub.cs
using Cysharp.Runtime.Multicast;
using InteractionShare.Shared.Hubs;
using InteractionShare.Shared.MessagePackObjects;
using MagicOnion.Server.Hubs;

namespace InteractionShare.Server;

public class InteractionShareHub : StreamingHubBaseIInteractionShareHub, IInteractionShareHubReceiver>, IInteractionShareHub
{
    private IGroupIInteractionShareHubReceiver>? room;
    private string myName = string.Empty;
    private readonly IMulticastSyncGroupGuid, IInteractionShareHubReceiver> roomForAll;

    public InteractionShareHub(IMulticastGroupProvider groupProvider)
    {
        roomForAll = groupProvider.GetOrAddSynchronousGroupGuid, IInteractionShareHubReceiver>("All");
    }

    public async Task JoinAsync(JoinRequest request)
    {
            this.room = await this.Group.AddAsync(request.RoomName);
            this.myName = request.UserName;
            this.room.All.OnJoin(request.UserName);
    }

    public async Task LeaveAsync()
    {
        if (this.room is not null)
        {
            await this.room.RemoveAsync(this.Context);
            this.room.All.OnLeave(this.myName);
        }
    }

    public async Task SendStatusAsync(string windowName, string fucntionName)
    {
        if (this.room is not null)
        {
            var response = new StatusResponce { UserName = this.myName, WindowName = windowName, FunctionName = fucntionName };
            this.roomForAll.All.OnSendStatus(response);
        }

        await Task.CompletedTask;
    }

    protected override ValueTask OnConnecting()
    {
        Console.WriteLine($"client connected {this.Context.ContextId}");
        roomForAll.Add(ConnectionId, Client);
        return CompletedTask;
    }

    protected override ValueTask OnDisconnected()
    {
        roomForAll.Remove(ConnectionId);
        return CompletedTask;
    }
}
Docker/Docker Compose
次にDocker、docker-compose を作成します。
プロジェクト「InteractionShare.Server」を右クリックして、「追加」->「コンテナー オーケストレーターのサポート」を選択します。
「Docker Compose」を選択し「OK」を押します。
コンテナースキャンフォールディングオプションは、デフォルトのままでOKです。
プロジェクト配下に「Dockerfile」が作成されます。今回ポートは443を使用しますので、Dockerfileの内容を以下の通り修正します。
Dockerfile
Dockerfile(修正前)
EXPOSE 8080
EXPOSE 8081
Dockerfile(修正後)
EXPOSE 443
また、作成された「docker-compose」の「docker-compose.yml」を開き、以下の通り編集します。
docker-compose.yml
services:
  interactionshare.server:
    image: ${DOCKER_REGISTRY-}interactionshareserver
    build:
      context: .
      dockerfile: InteractionShare.Server/Dockerfile
    ports:
      - "5000:443"
    expose:
      - "443"
    environment:
      - ASPNETCORE_ENVIRONMENT=Development
      - ASPNETCORE_URLS=https://+
      - ASPNETCORE_HTTPS_PORT=443
以上でInteractionShare.Serverの作成は完了です。
InteractionShare.App
最後にクライアント側アプリ「InteractionShare.App」を作成します。新しいプロジェクトの作成にて「WPFアプリケーション」を選択し作成します。
プロジェクトを作成したら、NuGetにて「MagicOnion.Client」「System.Reactive」をインストールします。
プロジェクトの参照の追加で、先に作成した「InteractionShare.Shared」を追加します。
使用するViewModelを作成します。
ViewModels/ViewModelSubWindow.cs
using InteractionShare.Shared.Hubs;
using System.ComponentModel;
using System.Windows.Input;

namespace InteractionShare.App.ViewModels
{
    public class ViewModelSubWindow : INotifyPropertyChanged
    {
        private IInteractionShareHub hub;
        private string editedElsewhere = string.Empty;
        public string EditedElsewhere
        {
            get => editedElsewhere;
            set { editedElsewhere = value; OnPropertyChanged(nameof(EditedElsewhere)); }
        }
        private string button01ClickInfo = string.Empty;
        public string Button01ClickInfo
        {
            get => button01ClickInfo;
            set { button01ClickInfo = value; OnPropertyChanged(nameof(Button01ClickInfo)); }
        }
        private string button02ClickInfo = string.Empty;
        public string Button02ClickInfo
        {
            get => button02ClickInfo;
            set { button02ClickInfo = value; OnPropertyChanged(nameof(Button02ClickInfo)); }
        }
        private string button03ClickInfo = string.Empty;
        public string Button03ClickInfo
        {
            get => button03ClickInfo;
            set { button03ClickInfo = value; OnPropertyChanged(nameof(Button03ClickInfo)); }
        }
        private string button04ClickInfo = string.Empty;
        public string Button04ClickInfo
        {
            get => button04ClickInfo;
            set { button04ClickInfo = value; OnPropertyChanged(nameof(Button04ClickInfo)); }
        }


        public ICommand Button01Command { get; }
        public ICommand Button02Command { get; }
        public ICommand Button03Command { get; }
        public ICommand Button04Command { get; }
        public ViewModelSubWindow(IInteractionShareHub interactionShareHub)
        {
            hub = interactionShareHub;
            Button01Command = new RelayCommand(OnButton01Click);
            Button02Command = new RelayCommand(OnButton02Click);
            Button03Command = new RelayCommand(OnButton03Click);
            Button04Command = new RelayCommand(OnButton04Click);
        }

        private async void OnButton01Click()
        {
            await hub.SendStatusAsync($"Button", "01");
        }
        private async void OnButton02Click()
        {
            await hub.SendStatusAsync($"Button", "02");
        }
        private async void OnButton03Click()
        {
            await hub.SendStatusAsync($"Button", "03");
        }
        private async void OnButton04Click()
        {
            await hub.SendStatusAsync($"Button", "04");
        }

        public event PropertyChangedEventHandler? PropertyChanged;
        protected void OnPropertyChanged(string propertyName)
            => PropertyChanged?.Invoke(this, new PropertyChangedEventArgs(propertyName));

        internal void SetButtonInfo(string userName, string functionName)
        {
            Button01ClickInfo = string.Empty;
            Button02ClickInfo = string.Empty;
            Button03ClickInfo = string.Empty;
            Button04ClickInfo = string.Empty;
            if (functionName == "01")
                Button01ClickInfo = $"{userName}がButton01をクリックしました";
            else if (functionName == "02")
                Button02ClickInfo = $"{userName}がButton02をクリックしました";
            else if (functionName == "03")
                Button03ClickInfo = $"{userName}がButton03をクリックしました";
            else if (functionName == "04")
                Button04ClickInfo = $"{userName}がButton04をクリックしました";
        }
    }
}
ViewModels/RelayCommand.cs
using System.Windows.Input;

namespace InteractionShare.App.ViewModels
{
    public class RelayCommand : ICommand
    {
        private readonly Action execute;
        private readonly Funcbool>? canExecute;

        public RelayCommand(Action execute, Funcbool>? canExecute = null)
        {
            this.execute = execute;
            this.canExecute = canExecute;
        }

        public bool CanExecute(object? parameter) => canExecute?.Invoke() ?? true;
        public void Execute(object? parameter) => execute();
        public event EventHandler? CanExecuteChanged;
    }
}
操作内容を共有するウィンドウを作成します。
Views/SubWindow.xaml
Window x:Class="InteractionShare.App.Views.SubWindow"
        xmlns="http://schemas.microsoft.com/winfx/2006/xaml/presentation"
        xmlns:x="http://schemas.microsoft.com/winfx/2006/xaml"
        xmlns:d="http://schemas.microsoft.com/expression/blend/2008"
        xmlns:mc="http://schemas.openxmlformats.org/markup-compatibility/2006"
        xmlns:local="clr-namespace:InteractionShare.App.Views"
        mc:Ignorable="d"
        Title="SubWindow"
        WindowStartupLocation="CenterScreen"
        Height="350"
        Width="400"
        Loaded="Window_Loaded"
        Unloaded="Window_Unloaded"
        >

    Window.Resources>
        ResourceDictionary>
            BooleanToVisibilityConverter x:Key="BooleanToVisibilityConverter" />
        ResourceDictionary>
    Window.Resources>

    Grid>
        Grid.RowDefinitions>
            RowDefinition Height="60"/>
            RowDefinition Height="*"/>
            RowDefinition Height="50"/>
        Grid.RowDefinitions>
        Label Grid.Row="0" Content="{Binding EditedElsewhere}" HorizontalAlignment="Center" VerticalAlignment="Top" FontSize="20" Margin="10" Foreground="Red"  />

        Grid Grid.Row="1">
            Grid.RowDefinitions>
                RowDefinition Height="*"/>
                RowDefinition Height="*"/>
            Grid.RowDefinitions>
            Grid.ColumnDefinitions>
                ColumnDefinition Width="50*"/>
                ColumnDefinition Width="50*"/>
            Grid.ColumnDefinitions>
            StackPanel Grid.Row="0" Grid.Column="0" Orientation="Vertical" >
                Button Name="Button01" Content="01" Command="{Binding Button01Command}" Margin="5" Width="120" Height="50" Tag="01"/>
                Label Content="{Binding Button01ClickInfo}" Height="50"/>
            StackPanel>
            StackPanel Grid.Row="0" Grid.Column="1" Orientation="Vertical" >
                Button Name="Button02" Content="02" Command="{Binding Button02Command}" Margin="5" Width="120" Height="50" Tag="02"/>
                Label Content="{Binding Button02ClickInfo}" Height="50"/>
            StackPanel>
            StackPanel Grid.Row="1" Grid.Column="0" Orientation="Vertical" >
                Button Name="Button03" Content="03" Command="{Binding Button03Command}" Margin="5" Width="120" Height="50" Tag="03"/>
                Label Content="{Binding Button03ClickInfo}" Height="50"/>
            StackPanel>
            StackPanel Grid.Row="1" Grid.Column="1" Orientation="Vertical" >
                Button Name="Button04" Content="04" Command="{Binding Button04Command}" Margin="5" Width="120" Height="50" Tag="04"/>
                Label Content="{Binding Button04ClickInfo}" Height="50"/>
            StackPanel>
        Grid>

        Button x:Name="ButtonClose" Grid.Row="2" Content="閉じる" HorizontalAlignment="Right" VerticalAlignment="Bottom" Margin="5" Width="120" Height="30" Click="ButtonClose_Click"/>
    Grid>
Window>
Views/SubWindow.xaml.cs
using InteractionShare.App.ViewModels;
using InteractionShare.Shared.Hubs;
using System.Windows;

namespace InteractionShare.App.Views
{
続いて、クライアント側の通信処理を作成します。
InteractionShareHubReceiver.cs
using InteractionShare.Shared.Hubs;
using InteractionShare.Shared.MessagePackObjects;
using System.Collections.ObjectModel;
using System.Reactive.Subjects;
using System.Windows;

namespace DataBridge.Client
{
    internal class InteractionShareHubReceiver : IInteractionShareHubReceiver
    {
        private readonly ObservableCollectionstring> dispMessages;
        private readonly SubjectStatusResponce> statusSubject;
        public IObservableStatusResponce> StatusObservable => statusSubject;

        public InteractionShareHubReceiver(ObservableCollectionstring> messages)
        {
            dispMessages = messages;
            statusSubject = new SubjectStatusResponce>();
        }

        public void OnJoin(string name)
        {
            Application.Current.Dispatcher.Invoke(() =>
            {
                dispMessages.Add($"[{name}]がJoinしました");
            });
        }

        public void OnLeave(string name)
        {
            Application.Current.Dispatcher.Invoke(() =>
            {
                dispMessages.Add($"[{name}]がLeaveしました");
            });
        }

        public void OnSendStatus(StatusResponce responce)
        {
            Application.Current.Dispatcher.Invoke(() =>
            {
                dispMessages.Add($"[{responce.UserName}]が{responce.WindowName}を{responce.FunctionName}しました");
                statusSubject.OnNext(responce);
            });
        }
    }
}
最後にMainWindowを作成します。
MainWindow.xaml
Window x:Class="InteractionShare.App.MainWindow"
        xmlns="http://schemas.microsoft.com/winfx/2006/xaml/presentation"
        xmlns:x="http://schemas.microsoft.com/winfx/2006/xaml"
        xmlns:d="http://schemas.microsoft.com/expression/blend/2008"
        xmlns:mc="http://schemas.openxmlformats.org/markup-compatibility/2006"
        xmlns:local="clr-namespace:InteractionShare.App"
        mc:Ignorable="d"
        Title="MainWindow" Height="400" Width="800"
        WindowStartupLocation="CenterScreen">
    Grid Margin="10">
        Grid.ColumnDefinitions>
            ColumnDefinition Width="300"/>
            ColumnDefinition Width="500"/>
        Grid.ColumnDefinitions>

        Grid.RowDefinitions>
            RowDefinition Height="*"/>
        Grid.RowDefinitions>

        Grid Grid.Column="0">
            Grid.RowDefinitions>
                RowDefinition Height="40"/>
                RowDefinition Height="40"/>
                RowDefinition Height="40"/>
                RowDefinition Height="40"/>
            Grid.RowDefinitions>
            Grid.ColumnDefinitions>
                ColumnDefinition Width="50*"/>
                ColumnDefinition Width="50*"/>
            Grid.ColumnDefinitions>

            StackPanel Orientation="Horizontal" Grid.Row="0" Grid.Column="0" Grid.ColumnSpan="2" >
                Label Content="User Name:" VerticalAlignment="Center" Margin="5"/>
                TextBox Name="TextBoxUserName" Text="UserA"  Width="200" Margin="5" Background="LightYellow" VerticalContentAlignment="Center"  />
            StackPanel>
            StackPanel Orientation="Horizontal" Grid.Row="1" Grid.Column="0" Grid.ColumnSpan="2" >
                Label Content="User Name:" VerticalAlignment="Center" Margin="5"/>
                TextBox Name="TextBoxServerName" Text="https://localhost:5000"  Width="200" Margin="5" Background="LightYellow" VerticalContentAlignment="Center"  />
            StackPanel>
            Button Name="ButtonJoin" Grid.Row="2" Grid.Column="0" Content="Join" Click="ButtonJoin_Click" Margin="5" />
            Button Name="ButtonLeave" Grid.Row="3" Grid.Column="0" Content="Leave" Click="ButtonLeave_Click" Margin="5" />

            Button Name="ButtonSubWindow" Grid.Row="2" Grid.Column="1" Content="Open SubWindow" Click="ButtonSubWindow_Click" Margin="5"  />
        Grid>


        ListBox Name="ListBoxMessages" Grid.Column="1"   />

    Grid>
Window>
MainWindow.xaml.cs
using DataBridge.Client;
using Grpc.Net.Client;
using InteractionShare.App.Views;
using InteractionShare.Shared.Hubs;
using InteractionShare.Shared.MessagePackObjects;
using MagicOnion.Client;
using System.Collections.ObjectModel;
using System.Windows;

namespace InteractionShare.App
{
以上でコーディングは完了です。
続いて、単一PCで動作確認を行っていきます。
接続先を「https://localhost:5000」にして、単一PC内で動作確認を行います。
サーバー、クライアント共に同じPC上で実行します。サーバー(InteractionShare.Server)はVisualStudioからデバッグ実行し、クライアントのWPFアプリ(InteractionShare.App)は事前にビルドしたexeを実行します。
Serverのデバッグ実行
先ほど作成した「Docker Compose」を右クリック->デバッグ->新しいインスタンス で実行します。

問題なく実行できれば、Docker DesktopのContainersに以下の様に表示されます。

この状態でビルド済みのWPFアプリ(InteractionShare.App)を実行すると、動作確認することができます。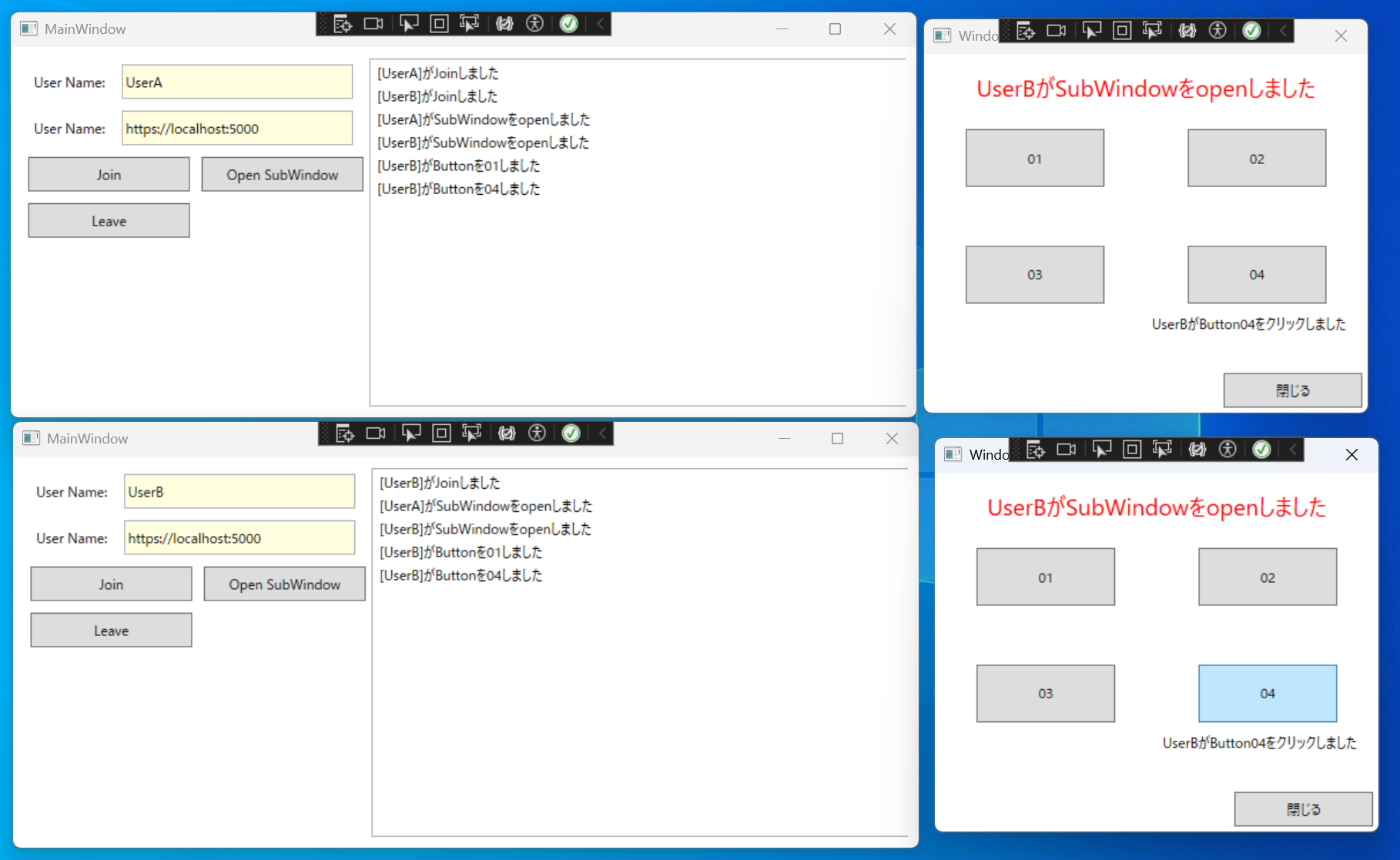
単一PCで問題なく動作する事が確認出来たら、デバッグを終了します。
その後、Docker Desktop上から該当のコンテナを削除します。

コンテナの削除が完了したら、複数PCで動作確認するための準備へ進みます。
複数のPC上からの動作確認を行うため、自己署名証明書を作成して環境を構築します。
自己署名証明書の作成
Power Shellにて以下のコマンドを実行し、自己署名証明書を作成します。
以下のコマンドの{ホスト名}{パスワード}を任意の値に修正して実行すると、デスクトップ上に「ホスト名.pfx」が作成されます。
$certname = "{ホスト名}"
$cert = New-SelfSignedCertificate `
-CertStoreLocation "Cert:\CurrentUser\My" `
-Subject "CN=$certname" `
-DnsName $certname `
-KeyExportPolicy Exportable `
-KeyLength 2048
$mypwd = ConvertTo-SecureString -String "{パスワード}" -Force -AsPlainText
$outputPath = $Env:HOMEDRIVE + $Env:HOMEPATH + "\Desktop\" + $certname + ".pfx"
Export-PfxCertificate -Cert $cert -FilePath $outputPath -Password $mypwd
(参考)
自己署名証明書の設定(サーバー側)
サーバー側のPCでは、作成した自己署名証明書を以下の通り設定します。
- ユーザー証明書の管理を開き、作成した証明書を「個人」-「証明書」から「信頼されたルート証明機関」-「証明書」へ移動します。


- コンテナ側からpfxファイルを読み込むため、以下のファイルパスを作成しpfxファイルをコピーします。
C:\Users\{ユーザー}\.aspnet\https\{ホスト名}.pfx

Docker Composeの修正
Docker Composeにて以下の処理を追加します。
(参考)
まず「docker-compose.yml」をコピーして「docker-compose.debug.yml」を作成します。ここからは、こちらを使う様にします。これはテスト起動を目的としてファイル内にパスワードを書き込んでしまうためです。
- pfxを読み込むため、証明書保管先をコンテナ上でマウントします
docker-compose.debug.yml
    volumes:
      - ~/.aspnet/https:/https:ro
- 証明書ファイル名、パスワードを記載します
docker-compose.debug.yml
    environment:
      - ASPNETCORE_Kestrel__Certificates__Default__Password={パスワード}
      - ASPNETCORE_Kestrel__Certificates__Default__Path=/https/{ホスト名}.pfx
まとめると、以下の様になります。
docker-compose.debug.yml
services:
  interactionshare.server:
    image: ${DOCKER_REGISTRY-}interactionshareserver
    build:
      context: .
      dockerfile: InteractionShare.Server/Dockerfile
    ports:
      - "5000:443"
    expose:
      - "443"
    volumes:
      - ~/.aspnet/https:/https:ro
    environment:
      - ASPNETCORE_ENVIRONMENT=Development
      - ASPNETCORE_URLS=https://+
      - ASPNETCORE_HTTPS_PORT=443
      - ASPNETCORE_Kestrel__Certificates__Default__Password={パスワード}
      - ASPNETCORE_Kestrel__Certificates__Default__Path=/https/{ホスト名}.pfx
完了したら、PowerShellにてDockerComposeを実行します。
cd {docker-compose.debug.ymlのパス}
docker-compose -f "docker-compose.debug.yml" up
自己署名証明書の設定(クライアント側)
サーバ側にて作成したpfxファイルを、クライアント側PCへもインストールします。
インストール時、保管場所を「信頼されたルート証明機関」-「証明書」に指定します。
動作確認
異なるPCでInteractionShare.App(WPFアプリ)を起動します。
接続先に「https://{サーバー名}:5000」を指定してJoinします。MagicOnion経由で操作内容がお互いの画面に表示される事を確認します。
サンプルコードを参考にMagicOnion + WPFで構築しましたが、かなり作りやすかったです。C#だけで完結できるのも、学習コストが低くて非常に助かります。
凄く楽しかったので、今後もいろいろやってみようと思います。
Views: 0
