
1. はじめに
初めまして、roswell と申します。
人生で初めての投稿になります!
私は普段、Emacs をエディタに用いています。
これまで Emacs は、自分でビルドすることはせず、
もっぱらビルド済みのものをダウンロードし利用していました。
2025年2月から Nix を利用し始めました。
Nix では多くのパッケージを利用できます。
Emacs も Nix Home Manager でダウンロードしたものを利用していました。
2021年4月末に Emacs にネイティブコンパイル機能が導入されました。
この機能を持つ Emacs を使ってみたいとは思いつつ、
自分でビルドする手間を考えると気が進みませんでした。
ネイティブコンパイル版のビルド手順を紹介する記事をいくつか参照してはみたものの、
「エディタとして使うだけなので、ビルドしなくても十分だろう」と考え、
結局ビルドには手をつけずにいました。
2025年6月末に、
Mac BookAir(13-inch,Early 2014) から Mac BookAir 13inch M4 に新調したこと、
Nix Home Manager でダウンロードして使用していた Emacs がネイティブコンパイル機能が有効でなかったこと、(今 ネイティブコンパイル機能が有効になっています!)
Nix についての理解が、ほんの少し深まったこと、
より、
Nix 環境でネイティブコンパイル機能を有効化した Emacs をビルドしてみようと思い立ちました。
その結果を、人生初の投稿この記事で共有したいと思います!
2. 対象読者
Mac で Nix を使ってEmacsをビルドしたい方へ
Mac 以外の環境でも、一部を除き参考になります
3. 記事をよむメリット
Nix shell を活用することで、Emacs のビルドが非常に簡単になります。
ビルド専用のシェルスクリプトなどを自前で作成する必要はなく、
shell.nix ファイル一つで完結できるようになります!
4. 結論
Nix shell を用いる事で、
Emacs のビルドを行うための必要なパッケージインストールや環境構築を行う際の心理的な障壁が、
格段に下がります。
既存のシステム環境に影響を与える心配も無くなるので、ビルド作業そのものが非常に簡単に感じられます。
本記事では Emacs のビルドに終始していますが、他のソフトウェアのビルドに関しても、
同じように Nix shell で作業を大幅に簡略化できるでしょう。
5. 本文
では、私が実際に行った Emacs のビルド手順を紹介していきます。
この手順通りに進めれば、Nix shell を用いて問題なく Emacs のビルドできます。
環境は、下記になります
MacBook Air 13inch M4
macOS Tahoe バージョン26.0
yama@roswell ~> nix --version
nix (Determinate Nix 3.6.6) 2.29.0
5.1. ビルド環境事前準備
5.1.1. 現在使用している Emacs のビルド時の設定 (Coniguration) を確認
Emacs 起動し、Scratch バッファで(emacs-build-description)
を評価すれば、
現在のビルド設定を確認できます。
この情報は、Emacs のビルド時に configure を実行する際、
どのオプションを選択すれば良いかの参考になります。
下記は、Nix Home Manager でダウンロードした Emacs (emacs-gtk) のビルド設定の結果です。--without-native-compilation
が含まれているため、ネイティブコンパイル機能は無効になっていることが分かります。
(emacs-build-description)

In GNU Emacs 30.1 (build 1, aarch64-apple-darwin24.5.0, NS
appkit-2575.60 Version 15.5 (Build 24F74))
Windowing system distributor 'Apple', version 10.3.2575
System Description:  macOS 15.6.1

Configured using:
 'configure
 --prefix=/nix/store/6amdpwylfp44w1safxp90x76cqd3z4r8-emacs-gtk3-30.1
 --disable-build-details --with-modules --disable-ns-self-contained
 --with-ns --with-compress-install --with-toolkit-scroll-bars
 --without-native-compilation --without-imagemagick --with-mailutils
 --without-small-ja-dic --with-tree-sitter --without-xinput2
 --without-xwidgets --without-dbus --without-selinux'
5.1.2. Xcode のインストール
Xcode を App Store からダウンロード、インストールし、使用可能な状態にしておきます。
Zenn の読者の方なら、説明不要と思うので詳細は割愛します。
5.1.3.Homebrew で gcc, libgccjit をインストール
Homebrew で gcc をインストール
yama@roswell /tmp> brew install gcc
...
yama@roswell /tmp> type gcc
gcc is /usr/bin/gcc

yama@roswell /tmp> gcc --version
Apple clang version 17.0.0 (clang-1700.3.19.1)
Target: arm64-apple-darwin25.0.0
Thread model: posix
InstalledDir: /Applications/Xcode.app/Contents/Developer/Toolchains/XcodeDefault.xctoolchain/usr/bin
Homebrew で libgccjit (libgcc just in time) をインストール
yama@roswell ~> brew install libgccjit
==> Fetching downloads for: libgccjit
==> Downloading https://ghcr.io/v2/homebrew/core/libgccjit/manifests/15.1.0-1

==> Fetching dependencies for libgccjit: gmp, isl, mpfr, libmpc, lz4, xz and zstd
...
==> Fetching libgccjit
==> Downloading https://ghcr.io/v2/homebrew/core/libgccjit/blobs/sha256:7287477cc3c67e3289f770ee9c70fddfb39f6ea7b925fdb775b54939b22e0

==> Installing dependencies for libgccjit: gmp, isl, mpfr, libmpc, lz4, xz and zstd
...
==> Installing libgccjit
==> Pouring libgccjit--15.1.0.arm64_tahoe.bottle.1.tar.gz
🍺  /opt/homebrew/Cellar/libgccjit/15.1.0: 15 files, 44.0MB
==> Running `brew cleanup libgccjit`...
Disable this behaviour by setting `HOMEBREW_NO_INSTALL_CLEANUP=1`.
Hide these hints with `HOMEBREW_NO_ENV_HINTS=1` (see `man brew`).
==> No outdated dependents to upgrade!
Homebrewを使わず、Nix shell環境のみでEmacsのビルドに挑戦しました。
しかし、必要な gcc と libgccjit を Nix shell環境内で用意しても成功しなかったため、
Homebrew で必要最小限のパッケージをインストールすることにしました。
5.1.4. libgccjit を用いたコードのコンパイルおよび実行確認
にあるサンプルコードをコピー&ペースし、tut01-hello-world.c という名前でファイルを作成します。
ここでは /tmp/tut01-hello-world.c として作成しました。
次に、以下のコマンドで、libgccjit リンクしてコンパイル実行を行います。gcc tut01-hello-world.c -o tut01-hello-world -lgccjit
bash-5.3$ pwd
/tmp
bash-5.3$ ls tut01-hello-world.c
tut01-hello-world.c
bash-5.3$ gcc tut01-hello-world.c -o tut01-hello-world -lgccjit
tut01-hello-world.c:20:10: fatal error: 'libgccjit.h' file not found
   20 |
      |          ^~~~~~~~~~~~~
1 error generated.
エラー結果より libgccjit.h が参照できていません。
bash-5.3$ find /opt/homebrew/include -name '*libgccjit*.h'
/opt/homebrew/include/libgccjit++.h
/opt/homebrew/include/libgccjit.h
/opt/homebrew/include 以下に、libgccjit.h があるので、
環境変数 C_INCLUDE_PATH に opt/homebrew/include をセットし、
再度コンパイルします。
bash-5.3$ export C_INCLUDE_PATH=/opt/homebrew/include
bash-5.3$ gcc tut01-hello-world.c -o tut01-hello-world -lgccjit
ld: library 'gccjit' not found
clang: error: linker command failed with exit code 1 (use -v to see invocation)
library gccjit not found と gccjit が参照できていません。
bash-5.3$ find /opt/homebrew/lib -name '*libgccjit*lib'
/opt/homebrew/lib/gcc/current/libgccjit.dylib
/opt/homebrew/lib/gcc/current/libgccjit.0.dylib
/opt/homebrew/lib/gcc/15/libgccjit.dylib
/opt/homebrew/lib/gcc/15/libgccjit.0.dylib

yama@roswell ~/D/emacs-30.2> ls -l /opt/homebrew/opt/libgccjit/lib/gcc/current/libgccjit.0.dylib
-r--r--r--  1 yama  admin  43976352 Sep 26 00:27 /opt/homebrew/opt/libgccjit/lib/gcc/current/libgccjit.0.dylib
yama@roswell ~/D/emacs-30.2> ls -l /opt/homebrew/opt/libgccjit/lib/gcc/15/libgccjit.0.dylib
lrwxr-xr-x  1 yama  admin  28 Apr 25 17:54 /opt/homebrew/opt/libgccjit/lib/gcc/15/libgccjit.0.dylib@ -> ../current/libgccjit.0.dylib
/opt/homebrew/lib 以下に、library gccjit が存在します。
ここには、current と 私の環境ではバージョン番号を示す 15 ディレクトリがありますが、15 の方は、current の方のシンボリックリンクです。
そのため、current を指定しておくと汎用的で良いです。
次に、ライブラリの検索パスをコンパイラに教えるため、
環境変数 LIBRARY_PATH に /opt/homebrew/lib/gcc/current を設定し、
再度コンパイルします。
bash-5.3$ export LIBRARY_PATH=/opt/homebrew/lib/gcc/current
bash-5.3$ gcc tut01-hello-world.c -o tut01-hello-world -lgccjit
エラーがなくなりましたね。
実行ファイル tut01-hello-world を実行してます。
bash-5.3$ ./tut01-hello-world
clang: warning: overriding deployment version from '16.0' to '26.0' [-Woverriding-deployment-version]
hello world
clang: warning:... が出ていますが、気にしなくてよいです!
これでひとまず、事前準備は完了です。
5.2. Emacsソース取得
私は、本家Emacs GNU Emacs Downlaod & Install
の Mirro site https://mirror.twds.com.tw/gnu/emacs/?C=M&O=D
から emacs-30.2.tar.gz を /tmp に download し伸長しました。
bash-5.3$ pwd
/tmp
bash-5.3$ ls emacs-30.2.tar.gz
emacs-30.2.tar.gz
bash-5.3$ tar zxvf emacs-30.2.tar.gz
...
5.3. shell.nix ファイルの準備
nix-shell で読み込む shell.nix ファイルを作成し、
下記の内容を記述し、Emacs ソースコード直下に配置します。
shell.nix
let
  nixpkgs = fetchTarball "https://github.com/NixOS/nixpkgs/nixpkgs-unstable";
  pkgs = import  { config = {}; overlays = []; };
in

pkgs.mkShellNoCC {
  packages = with pkgs; [
    autoconf # for autogen.sh
    pkg-config
    gnutls
    tree-sitter
  ];

  C_INCLUDE_PATH="/opt/homebrew/include";
  LIBRARY_PATH="/opt/homebrew/opt/libgccjit/lib/gcc/current";
}
pkages = with pkgs; [ ... ] が、ビルドに必要なパッケージC_INCLUDE_PATH , LIBRARY_PATH が、ビルド時に必要な環境変数
になります。
bash-5.3$ pwd
/tmp/emacs-30.2
bash-5.3$ ls shell.nix
shell.nix
5.4. nix-shell起動
前のステップで設定した環境変数 C_INCLUDE_PATH および LIBRARY_PATH が、
nix-shell の環境内でのみ有効であることを確認するため、
一度ターミナル上のシェルから exit した状態から nix-shell を起動します。
nix-shell を起動すると、
必要なライブラリ等のダウンロードが始まり、
プロンプトが [nix-shell:...] のように変化し、
ビルドに必要なツールや設定が整った隔離された環境に入れます。
bash-5.3$ pwd
/tmp/emacs-30.2
bash-5.3$ printenv C_INCLUDE_PATH LIBRARY_PATH
bash-5.3$ nix-shell

[nix-shell:/tmp/emacs-30.2]$ printenv C_INCLUDE_PATH LIBRARY_PATH
/opt/homebrew/include
/opt/homebrew/opt/libgccjit/lib/gcc/current

[nix-shell:/tmp/emacs-30.2]$
5.5. Emacsのビルド autogen.shの実行
ここからようやく、Emacs のビルド作業に入っていきます。
以降は、通常の Emacs ビルド手順になります。
autogen.sh を実行します。
[nix-shell:/tmp/emacs-30.2]$ ./autogen.sh
Checking whether you have the necessary tools...
(Read INSTALL.REPO for more details on building Emacs)
Checking for autoconf (need at least version 2.65) ... ok
Your system has the required tools.
Running 'autoreconf -fi -I m4' ...
Building 'aclocal.m4' in exec ...
Running 'autoreconf -fi' in exec ...
You can now run './configure'.
5.6. Emacsのビルド configure の実行
次に configure を実行します。
configure 実行時に指定できるオプションや環境変数はconfigure --help で参照できます。
では、事前確認しておいた configure のオプションを
- ネイティブコンパイル機能を有効にしたいので、
--without-native-compilation を --with-native-compilation
- xwidget-webkit 機能を有効にしたいので、
--without-xwidgets を --with-xwigets
に変更し実行します。
[nix-shell:/tmp/emacs-30.2]$ ./configure --disable-build-details --with-modules --disable-ns-self-contained --with-ns --with-compress-install --with-toolkit-scroll-bars --with-native-compilation --without-imagemagick --with-mailutils --without-small-ja-dic --with-tree-sitter --without-xinput2 --with-xwidgets --without-dbus --without-selinux
checking for xcrun... xcrun
checking for make... yes
checking for GNU Make... make
checking build system type... aarch64-apple-darwin25.0.0
checking host system type... aarch64-apple-darwin25.0.0
checking for gcc... gcc
...
config.status: creating admin/grammars/Makefile
config.status: creating java/Makefile
config.status: creating cross/Makefile
config.status: creating java/AndroidManifest.xml
config.status: creating src/config.h
config.status: executing src/epaths.h commands
config.status: executing src/.gdbinit commands
config.status: executing doc/emacs/emacsver.texi commands
config.status: executing etc-refcards-emacsver.tex commands
ご自身が望む configure オプションを指定し、
エラーになった場合は、必要なパッケージを
から検索し、shell.nix ファイルの pkages = with pkgs; [ ... ] に追加していけば良いでしょう。
5.6. Emacsのビルド make
make を実行します。
実行時のログを後から参照できるように、make.log というファイルに落とすようにしています。
[nix-shell:/tmp/emacs-30.2]$ make 2>&1 | tee make.log
...
make sanity-check make-target=all
make[1]: Entering directory '/private/tmp/emacs-30.2'
make[1]: Leaving directory '/private/tmp/emacs-30.2'
5.7. Emacsのビルド成果物動作確認
[nix-shell:/tmp/emacs-30.2]$ ls -F src/emacs
src/emacs*

[nix-shell:/tmp/emacs-30.2]$ ./src/emacs --version
GNU Emacs 30.2
Copyright (C) 2025 Free Software Foundation, Inc.
GNU Emacs comes with ABSOLUTELY NO WARRANTY.
You may redistribute copies of GNU Emacs
under the terms of the GNU General Public License.
For more information about these matters, see the file named COPYING.
configure のオプションで指定した、--with-native-compilation 、--with-xwigets が有効になっています。
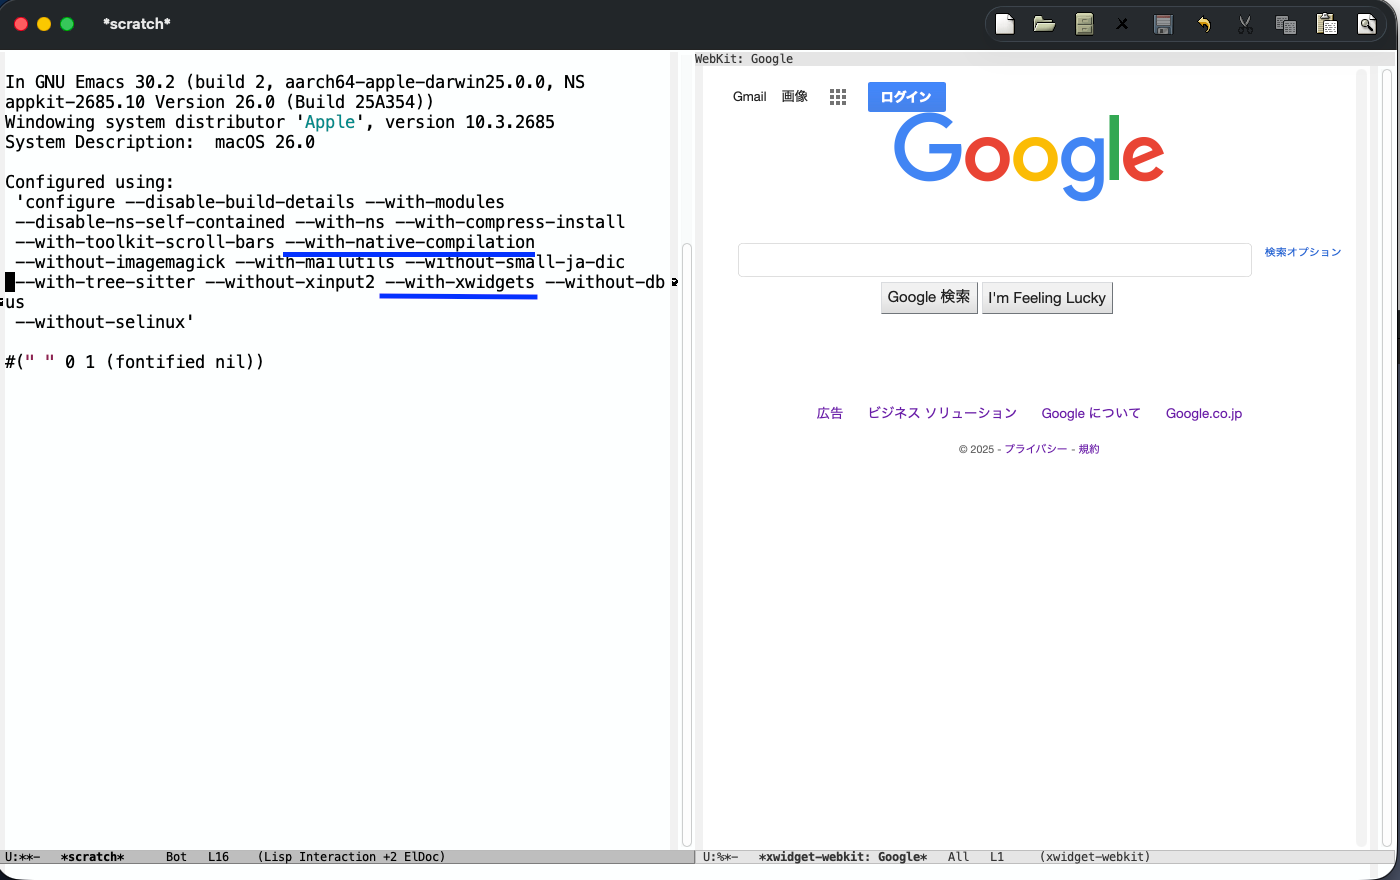
期待したビルド結果になっているのが分かります。
5.8. Emacsのビルドをさらに簡略化
今回、ビルド環境の構築を shell.nix に記述し、
以降は通常の Emacs ビルド手順でしたが、
に記述されている Nix shell の shellHook 機能を用い、
shell.nix に、shellHook を追加し、
shell.nix
  LIBRARY_PATH="/opt/homebrew/opt/libgccjit/lib/gcc/current";

  shellHook = ''
    ./autogen.sh
    ./configure --disable-build-details --with-modules --disable-ns-self-contained --with-ns --with-compress-install --with-toolkit-scroll-bars --with-native-compilation --without-imagemagick --with-mailutils --without-small-ja-dic --with-tree-sitter --without-xinput2 --with-xwidgets --without-dbus --without-selinux
    make
  '';
}
nix-shell 環境に、入り直すことで、./autogen.sh./configure ...make
を自動的に順に実行してくれます。
実際には、個々のビルドフェーズでエラーが出た場合の対処を考慮する必要がありますが、
個人で使う分には、ビルド手順が劇的に簡略化されます。
この手軽さのおかげで、
Emacsを自分でビルドすることに対する心理的な障壁はかなり低くなりました。
6. まとめ
通常、Emacsのビルドに必要なパッケージ等を
Mac のシステム環境としてインストールする必要があります。
このことにより、既存のシステム環境が壊れる可能性があります。
しかし、
Nix shell を用いることで、
Macのシステム環境に影響を及ぼさず、
ビルドに必要な要素
- 必要なパッケージの記述
- 必要な環境変数の設定
- ビルド手順の記述
全てを、shell.nix に記述し、ビルドを一元管理できる Nix の仕組みは、
本当に素晴らしいと実感しました。
参考文献
- 人生初の記事投稿にあたり、本記事の記述にあたり参考にさせていただきました。
Emacs を正しくビルドするために configure.ac を理解する
ネイティブコンパイルEmacsの登場
…
謝辞
Slack vim-jp コミュニティの皆様には、
私の拙い質問にもかかわらず、いつもサポートしていただいています。
特に今回のNix環境でのEmacsビルドについても、
tech-nixチャンネルで様々なご支援をいただきました。心より感謝申し上げます。
NixやEmacsなどに興味がある方は、ぜひvim-jpへの参加をご検討ください。
Views: 0
