
Flutterで本番環境・テスト環境を分けるときに使用する機能で、Flavorなるものがあります。使ってない案件もやったことあるのですが、最近中途半端に導入してる仕事に当たってしまいこれは、理解が必要だなと思い学び直してみました。
Firebase CLIの設定が必要なのでツールのインストールとパスの設定をしておいてください。
記事の対象者
- FlutterでFirebase CLIを使ったことがある
- iOS & Androidに対応した設定を知りたい
OSごとの設定は公式を参考にしてみる。
Firebase CLIの設定は、CODE WITH ANDREAを参考にしました。
環境は3つありますが独自の名前のものも企業によってあったりします。
- prod or production
- stg or staging
- dev or development
prodは本番環境、stgは本番リリース前に本番と同じ環境のテスト環境、devはテスト環境。開発が始まったら、devでやることが多いですね。prodとdevしかないことが多いような?
Firebaseのプロジェクトを作成しよう。flavor_tutorialに、-prod, -staging, -devをつける。xcodeの設定を公式通りにやるなら、stgよりstagingの方が良かったりする。
皆さんが作成するプロジェクト名につけてください!
- flavor-tutorial-prod
- flavor-tutorial-staging
- flavor-tutorial-dev

devだけスクリーンショット撮り忘れましたが以下のように、-区切りで作成すればOK


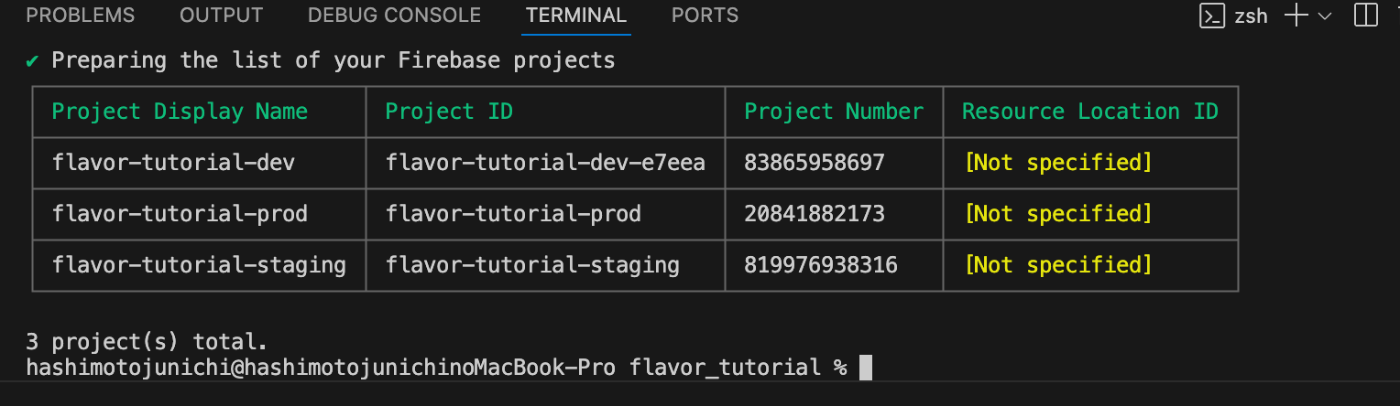
3つプロジェクトが作成できればOK!
stagingいらない場合は作らなくてもOK!
プロジェクトIDを調べる。


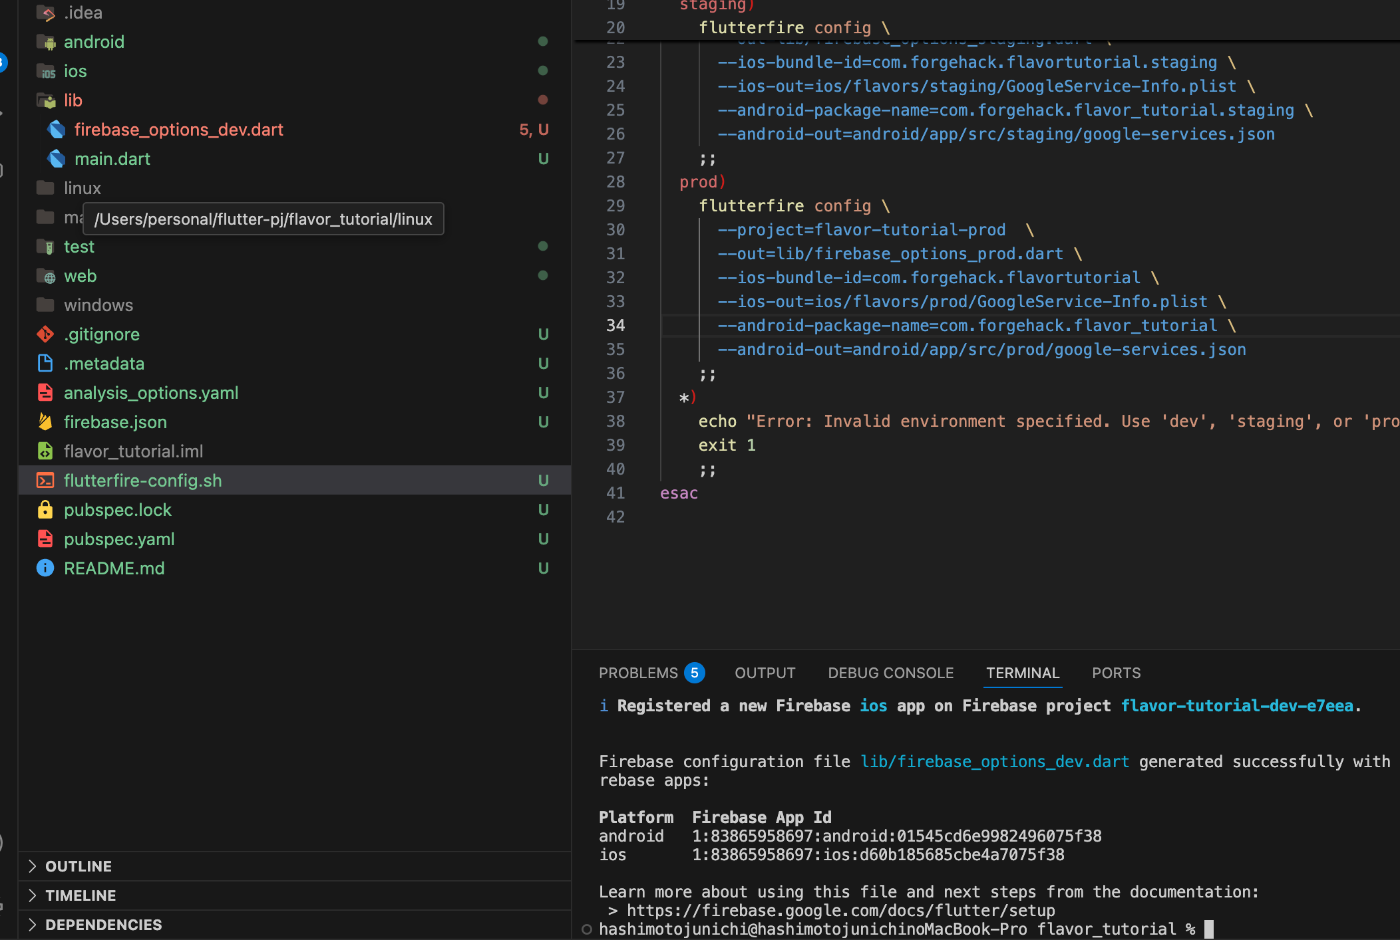
flutterfire-config.shを作成する。プロジェクトIDを設定すること。

以下のファイルに設定👇
#!/bin/bash


if [[ $# -eq 0 ]]; then
  echo "Error: No environment specified. Use 'dev', 'staging', or 'prod'."
  exit 1
fi

case $1 in
  dev)
    flutterfire config \
      --project=flavor-tutorial-dev-e7eea \
      --out=lib/firebase_options_dev.dart \
      --ios-bundle-id=com.forgehack.flavor_tutorial.dev \
      --ios-out=ios/flavors/dev/GoogleService-Info.plist \
      --android-package-name=com.forgehack.flavor_tutorial.dev \
      --android-out=android/app/src/dev/google-services.json
    ;;
  staging)
    flutterfire config \
      --project=flavor-tutorial-staging \
      --out=lib/firebase_options_staging.dart \
      --ios-bundle-id=com.forgehack.flavor_tutorial.staging \
      --ios-out=ios/flavors/staging/GoogleService-Info.plist \
      --android-package-name=com.forgehack.flavor_tutorial.staging \
      --android-out=android/app/src/staging/google-services.json
    ;;
  prod)
    flutterfire config \
      --project=flavor-tutorial-prod  \
      --out=lib/firebase_options_prod.dart \
      --ios-bundle-id=com.forgehack.flavor_tutorial \
      --ios-out=ios/flavors/prod/GoogleService-Info.plist \
      --android-package-name=com.forgehack.flavor_tutorial \
      --android-out=android/app/src/prod/google-services.json
    ;;
  *)
    echo "Error: Invalid environment specified. Use 'dev', 'staging', or 'prod'."
    exit 1
    ;;
esac
と思ったら、-が入っててiOSが失敗した😅
iOSのフォーマットを修正したものを使用する。
#!/bin/bash


if [[ $# -eq 0 ]]; then
  echo "Error: No environment specified. Use 'dev', 'staging', or 'prod'."
  exit 1
fi

case $1 in
  dev)
    flutterfire config \
      --project=flavor-tutorial-dev-e7eea \
      --out=lib/firebase_options_dev.dart \
      --ios-bundle-id=com.forgehack.flavortutorial.dev \
      --ios-out=ios/flavors/dev/GoogleService-Info.plist \
      --android-package-name=com.forgehack.flavor_tutorial.dev \
      --android-out=android/app/src/dev/google-services.json
    ;;
  staging)
    flutterfire config \
      --project=flavor-tutorial-staging \
      --out=lib/firebase_options_staging.dart \
      --ios-bundle-id=com.forgehack.flavortutorial.staging \
      --ios-out=ios/flavors/staging/GoogleService-Info.plist \
      --android-package-name=com.forgehack.flavor_tutorial.staging \
      --android-out=android/app/src/staging/google-services.json
    ;;
  prod)
    flutterfire config \
      --project=flavor-tutorial-prod  \
      --out=lib/firebase_options_prod.dart \
      --ios-bundle-id=com.forgehack.flavortutorial \
      --ios-out=ios/flavors/prod/GoogleService-Info.plist \
      --android-package-name=com.forgehack.flavor_tutorial \
      --android-out=android/app/src/prod/google-services.json
    ;;
  *)
    echo "Error: Invalid environment specified. Use 'dev', 'staging', or 'prod'."
    exit 1
    ;;
esac
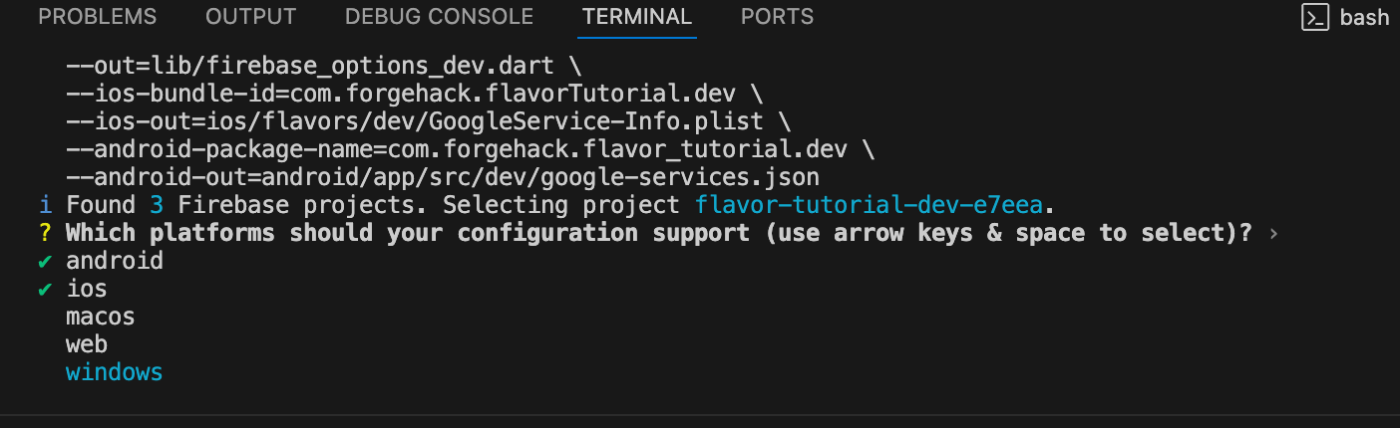
Dev環境を最初に作成。次にStagingとProdを作成していきます。
Dev
./flutterfire-config.sh dev


ファイルが生成されたら成功!
失敗したら、BundleIDやapplicationIDが間違っている!
同じように実行していきましょう。
Staging
./flutterfire-config.sh staging
Stagingは、Profileというのを選択しました。

Prod
./flutterfire-config.sh prod
本番環境はリリースなのでReleaseを選択します。


.gitignoreに記載してコミットの対象外にした方がいいらしい。しかしやってないことが多いような。。。
# Ignore Firebase configuration files
lib/firebase_options*.dart
ios/Runner/GoogleService-Info.plist
ios/flavors/*/GoogleService-Info.plist
macos/Runner/GoogleService-Info.plist
macos/flavors/*/GoogleService-Info.plist
android/app/google-services.json
android/app/src/*/google-services.json

Firebaseに必要なpackageを追加する。
flutter pub add firebase_core
flutter pub add cloud_firestore
iOSとAndroidのディレクトリに、Firebaseの環境分けしたファイルがあれば成功している。今だと自動生成されるからありがたい。たまに壊れますが🧨

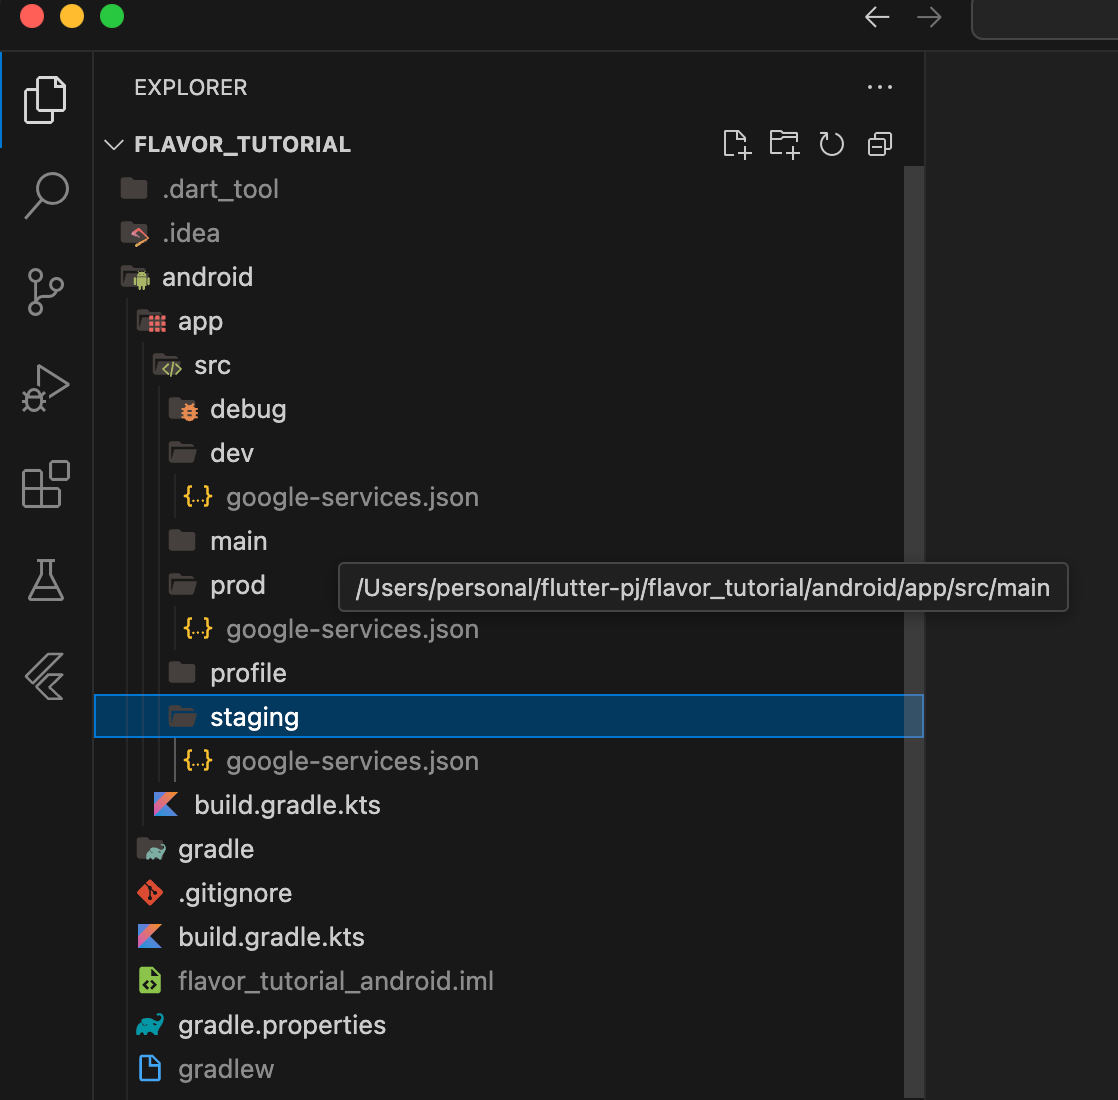
Androidの環境分け
自動で設定が追加されるが、自分でも追加設定する。Androidだと実は意外と環境分けは簡単なことあるんですよね。iOSの方は、xcodeを画面を操作しながら設定したりするので難しい😅
android/settings.gradle.ktsは自動で追加されてるのでOK!
pluginManagement {
    val flutterSdkPath = run {
        val properties = java.util.Properties()
        file("local.properties").inputStream().use { properties.load(it) }
        val flutterSdkPath = properties.getProperty("flutter.sdk")
        require(flutterSdkPath != null) { "flutter.sdk not set in local.properties" }
        flutterSdkPath
    }

    includeBuild("$flutterSdkPath/packages/flutter_tools/gradle")

    repositories {
        google()
        mavenCentral()
        gradlePluginPortal()
    }
}

plugins {
    id("dev.flutter.flutter-plugin-loader") version "1.0.0"
    id("com.android.application") version "8.7.0" apply false

    id("com.google.gms.google-services") version("4.3.15") apply false

    id("org.jetbrains.kotlin.android") version "1.8.22" apply false
}

include(":app")
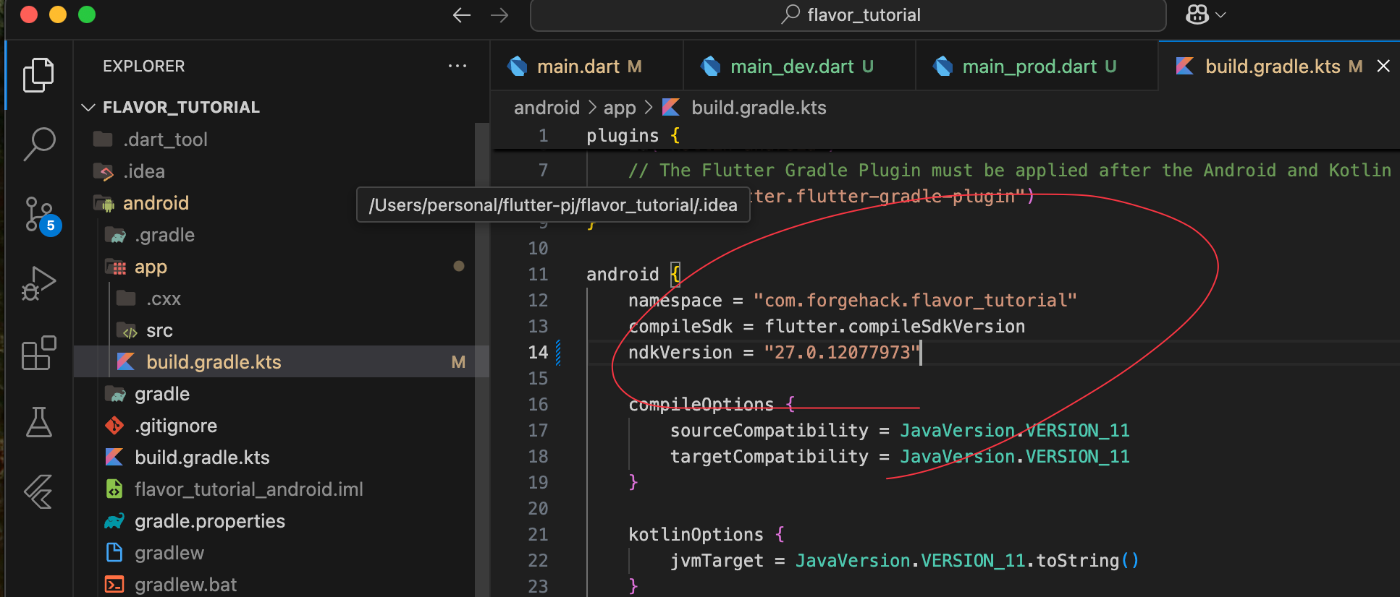
android/app/build.gradle.ktsは設定追加してます。実験してたときは、stgとstagingがごちゃ混ぜで、iOS buildするときに、スキームの名前と違ったのでミスが起きた😅
plugins {
    id("com.android.application")

    id("com.google.gms.google-services")

    id("kotlin-android")

    id("dev.flutter.flutter-gradle-plugin")
}

android {
    namespace = "com.forgehack.flavor_tutorial"
    compileSdk = flutter.compileSdkVersion
    ndkVersion = flutter.ndkVersion

    compileOptions {
        sourceCompatibility = JavaVersion.VERSION_11
        targetCompatibility = JavaVersion.VERSION_11
    }

    kotlinOptions {
        jvmTarget = JavaVersion.VERSION_11.toString()
    }

    defaultConfig {

        applicationId = "com.forgehack.flavor_tutorial"


        minSdk = flutter.minSdkVersion
        targetSdk = flutter.targetSdkVersion
        versionCode = flutter.versionCode
        versionName = flutter.versionName
    }

    buildTypes {
        release {


            signingConfig = signingConfigs.getByName("debug")
        }
    }


    flavorDimensions += "environment"
    productFlavors {
        create("dev") {
            dimension = "environment"
            applicationIdSuffix = ".dev"
            resValue("string", "app_name", "FlavorFirebase DEV")
        }
        create("staging") {
            dimension = "environment"
            applicationIdSuffix = ".staging"
            resValue("string", "app_name", "FlavorFirebase STAGING")
        }
        create("prod") {
            dimension = "environment"
            resValue("string", "app_name", "FlavorFirebase")
        }
    }
}

flutter {
    source = "../.."
}
main.dartのファイルを複数作成する
prod, stagin, dev用のmain.dartを作成してください。

先に、main.dartを編集しておきます。
main.dart
import 'package:firebase_core/firebase_core.dart';
import 'package:flutter/material.dart';
import 'package:cloud_firestore/cloud_firestore.dart';
String currentFlavor = 'unknown';
final FirebaseFirestore firestore = FirebaseFirestore.instance;
Futurevoid> mainCommon(FirebaseOptions options, {required String flavor}) async {
WidgetsFlutterBinding.ensureInitialized();
currentFlavor = flavor;
debugPrint('✨✨✨ FLAVOR SET TO: $currentFlavor ✨✨✨');
await Firebase.initializeApp(options: options);
runApp(const MyApp());
}
class MyApp extends StatelessWidget {
const MyApp({super.key});
Widget build(BuildContext context) {
String appName = 'Flutter Demo';
Color seedColor;
String flavorLabel;
switch (currentFlavor) {
case 'dev':
seedColor = Colors.blue;
flavorLabel = '[DEV]';
break;
case 'staging':
seedColor = Colors.amber;
flavorLabel = '[STAGING]';
break;
case 'prod':
seedColor = Colors.green;
flavorLabel = '[PROD]';
break;
default:
seedColor = Colors.deepPurple;
flavorLabel = '';
}
return MaterialApp(
title: '$appName $flavorLabel',
theme: ThemeData(
colorScheme: ColorScheme.fromSeed(seedColor: seedColor),
),
home: MyHomePage(title: '$appName $flavorLabel'),
);
}
}
class MyHomePage extends StatefulWidget {
const MyHomePage({super.key, required this.title});
final String title;
StateMyHomePage> createState() => _MyHomePageState();
}
class _MyHomePageState extends StateMyHomePage> {
int _counter = 0;
final CollectionReference usersCollection = FirebaseFirestore.instance.collection('users');
void _incrementCounter() {
setState(() {
_counter++;
});
}
Widget build(BuildContext context) {
return Scaffold(
appBar: AppBar(
backgroundColor: Theme.of(context).colorScheme.inversePrimary,
title: Text(widget.title),
),
body: Center(
child: Column(
mainAxisAlignment: MainAxisAlignment.center,
children: Widget>[
Text(
'Current Flavor: ${currentFlavor.toUpperCase()}',
style: const TextStyle(
fontSize: 18,
fontWeight: FontWeight.bold,
),
),
const SizedBox(height: 24),
const Text('You have pushed the button this many times:'),
Text(
'$_counter',
style: Theme.of(context).textTheme.headlineMedium,
),
const SizedBox(height: 30),
...switch (currentFlavor) {
'dev' || 'staging' => [
Text(
'Users from Firestore (${currentFlavor.toUpperCase()}):',
style: const TextStyle(
fontSize: 16,
fontWeight: FontWeight.bold,
),
),
const SizedBox(height: 10),
Expanded(
child: StreamBuilderQuerySnapshot>(
stream: usersCollection.snapshots(),
builder: (context, snapshot) {
if (snapshot.connectionState == ConnectionState.waiting) {
return const Center(child: CircularProgressIndicator());
}
if (snapshot.hasError) {
return Center(child: Text('Error: ${snapshot.error}'));
}
if (!snapshot.hasData || snapshot.data!.docs.isEmpty) {
return const Center(child: Text('No users found'));
}
return ListView.builder(
itemCount: snapshot.data!.docs.length,
itemBuilder: (context, index) {
final doc = snapshot.data!.docs[index];
final data = doc.data() as MapString, dynamic>;
final name = data['name'] ?? 'No name';
return ListTile(
leading: CircleAvatar(
backgroundColor: Theme.of(context).colorScheme.primary,
child: Text(name.substring(0, 1).toUpperCase()),
),
title: Text(name),
subtitle: Text('User ID: ${doc.id}'),
);
},
);
},
),
),
],
'prod' => [
const SizedBox(height: 10),
const Text(
'This is the production environment.',
style: TextStyle(
fontSize: 16,
fontWeight: FontWeight.bold,
color: Colors.green,
),
),
const SizedBox(height: 20),
const Icon(
Icons.verified,
color: Colors.green,
size: 48,
),
const SizedBox(height: 20),
const Text(
'Firestore access is restricted in production.',
style: TextStyle(color: Colors.redAccent),
),
Expanded(
child: StreamBuilderQuerySnapshot>(
stream: usersCollection.snapshots(),
builder: (context, snapshot) {
if (snapshot.connectionState == ConnectionState.waiting) {
return const Center(child: CircularProgressIndicator());
}
if (snapshot.hasError) {
return Center(child: Text('Error: ${snapshot.error}'));
}
if (!snapshot.hasData || snapshot.data!.docs.isEmpty) {
return const Center(child: Text('No users found'));
}
return ListView.builder(
itemCount: snapshot.data!.docs.length,
itemBuilder: (context, index) {
final doc = snapshot.data!.docs[index];
final data = doc.data() as MapString, dynamic>;
final name = data['name'] ?? 'No name';
return ListTile(
leading: CircleAvatar(
backgroundColor: Theme.of(context).colorScheme.primary,
child: Text(name.substring(0, 1).toUpperCase()),
),
title: Text(name),
subtitle: Text('User ID: ${doc.id}'),
);
},
);
},
),
),
],
_ => []
},
],
),
),
floatingActionButton: Column(
mainAxisAlignment: MainAxisAlignment.end,
children: [
...switch (currentFlavor) {
'dev' || 'staging' => [
Padding(
padding: const EdgeInsets.only(bottom: 16.0),
child: FloatingActionButton(
onPressed: () async {
try {
final timestamp = DateTime.now().millisecondsSinceEpoch;
await usersCollection.add({
'name': 'Test User $timestamp ${currentFlavor.toUpperCase()}',
'createdAt': FieldValue.serverTimestamp(),
'environment': currentFlavor,
});
if (context.mounted) {
ScaffoldMessenger.of(context).showSnackBar(
const SnackBar(content: Text('User added successfully')),
);
}
} catch (e) {
if (context.mounted) {
ScaffoldMessenger.of(context).showSnackBar(
SnackBar(content: Text('Error adding user: $e')),
);
}
}
},
heroTag: 'addUser',
backgroundColor: currentFlavor == 'dev' ? Colors.green : Colors.orange,
child: const Icon(Icons.person_add),
),
),
],
_ => []
},
FloatingActionButton(
onPressed: _incrementCounter,
tooltip: 'Increment',
heroTag: 'increment',
child: const Icon(Icons.add),
),
],
),
);
}
}
Prod
main_prod.dart
import 'package:flavor_tutorial/firebase_options_prod.dart';
import 'package:flavor_tutorial/main.dart';
import 'package:flutter/material.dart';

void main() async {

  debugPrint('Running with flavor: PROD');


  await mainCommon(DefaultFirebaseOptions.currentPlatform, flavor: 'prod');
}
main.dartをimportしてこちらのモジュールで使用します。irebase_optionsのところですが、間違って、devをimportしてなくてモジュールが往復してるエラーが起きました。prod, staging, devに対応したものが、importされているか確認しましょう。
Staging
main_staging.dart
import 'package:flavor_tutorial/firebase_options_staging.dart';
import 'package:flavor_tutorial/main.dart';
import 'package:flutter/material.dart';

void main() async {

  debugPrint('Running with flavor: STAGING');


  await mainCommon(DefaultFirebaseOptions.currentPlatform, flavor: 'staging');
}
Dev
main_dev.dart
import 'package:flavor_tutorial/firebase_options_dev.dart';
import 'package:flavor_tutorial/main.dart';
import 'package:flutter/material.dart';

void main() async {

  debugPrint('Running with flavor: DEV');


  await mainCommon(DefaultFirebaseOptions.currentPlatform, flavor: 'dev');
}
buildするときは、こちらのコマンドを実行します。launch.json を作成すればボタンを押すだけでビルドできるのですが、こちら設定が追加で必要になります。
今回はコマンドだけでやってみますか。
flutter run --flavor dev -t lib/main_dev.dart
flutter run --flavor staging -t lib/main_staging.dart
flutter run --flavor prod -t lib/main_prod.dart
Android buildしたときに、赤いエラー出たら修正したらビルドできると思われます。

Cloud Firestoreを使用した方が環境分けができているかわかりやすいので、作成して検証をしてみましょう。
prod, staging, dev3つとも同じように設定してください。


テストモードで作成しておきましょう。
ダミーデータを3つの環境で用意してください。


ダミーデータが表示できればOK!
右のボタンなのですが、コレクションIDが存在しないと押せませんでした?

Stagingも同じように実行。stgのままのテキスト使ったので失敗していた😅
flutter run --flavor staging -t lib/main_staging.dart

prodもビルドできました。結構難しいね。

Androidブランチで一旦作成いたしました。こちらが完成品。引き続きiOS版も作っていく!
Schemeと呼ばれているものと設定ファイルさえ作成すればおそらく問題なくビルドできると思う。Schemeさえできれば後は、設定ファイルを作成するだけです。
では、xcodeでSchemeの設定をしていきましょう。これをしないとFlavorのコマンドを実行することができません😇
iOSは特殊でした。

New Schemeから、prod, staging, devを作成してください。


こちらに設定を追加していきます。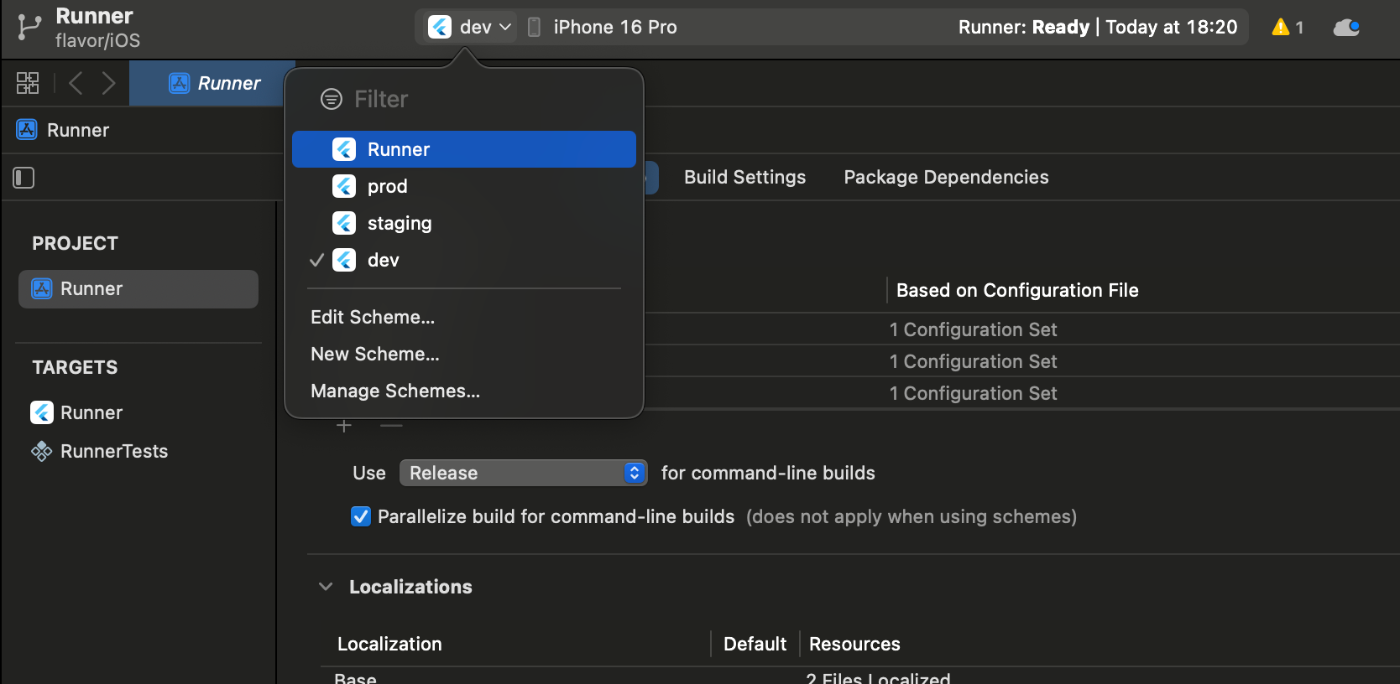
Create configurations for the schemes in Xcode:
In the project navigator, select Runner.
In the main window under PROJECT, select Runner.
Open the Info tab if it isn’t open.
Go to the Configurations section and add new Debug configurations.
- Click +, select Duplicate “Debug” configuration, and name the new configuration Debug-staging.
- Click +, select Duplicate “Debug” configuration, and name the new configuration Debug-production.
Repeat the previous step for the Release configurations and the Profile configurations.
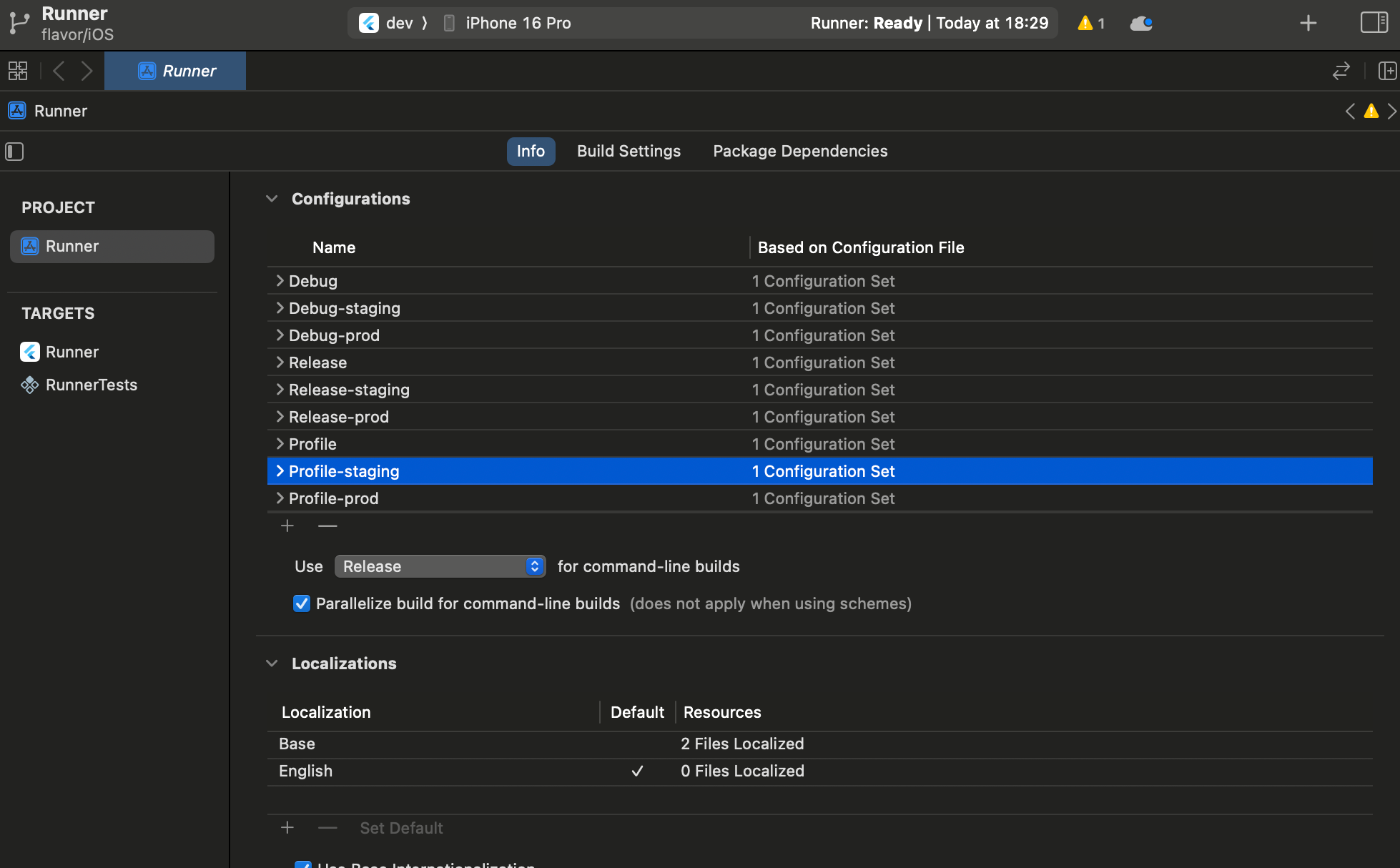
When finished, check to make sure that you have the following configurations:
公式によれば、Click +, select Duplicate “Debug”を押してくれと言っております。
- Debug-staging
- Debug-production
を作っていきますが、今回と名前が違うのがある。そうstagingは合わせて作ったが、productionはprodで作ったので、prodにする。
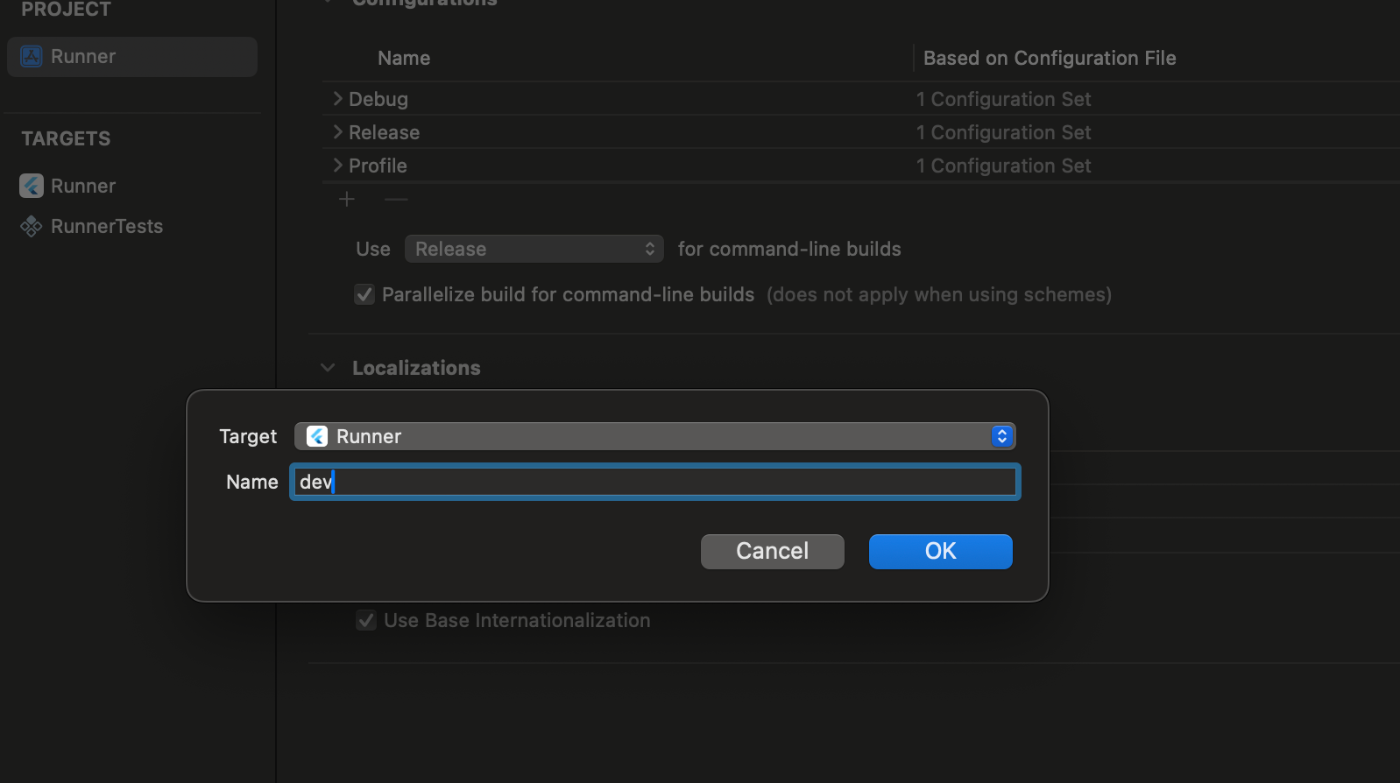
こちらを作成する

こんな感じで作成して、Enterキーを押します。

これで完成!
こちらを作ったらいけるはず!
別のサンプルを参考に作成


Devを編集する。Flutter公式通りに設定する。


Stagingも同じ設定で良い。Prodだけ違う。
Debug.xconfig, Profile.xcconfig, and Release.xcconfigが必要だったので作成する。

ios/Flutter/Debug-dev.xcconfig
#include "dev.xcconfig"
#include "Debug.xcconfig"
ios/Flutter/Debug-prod.xcconfig
#include "prod.xcconfig"
#include "Debug.xcconfig"
ios/Flutter/Debug-staging.xcconfig
#include "staging.xcconfig"
#include "Debug.xcconfig"
ios/Flutter/Debug.xcconfig
#include? "Pods/Target Support Files/Pods-Runner/Pods-Runner.debug.xcconfig"
#include "Generated.xcconfig"
ios/Flutter/dev.xcconfig
#include "Generated.xcconfig"
FLUTTER_TARGET=lib/main_dev.dart
ASSET_PREFIX=dev
BUNDLE_NAME=FlavorFirebase Dev
BUNDLE_DISPLAY_NAME=FlavorFirebase Dev
下のファイルも作成する。
ios/Flutter/prod.xcconfig
#include "Generated.xcconfig"
FLUTTER_TARGET=lib/main_prod.dart
ASSET_PREFIX=
BUNDLE_NAME=FlavorFirebase
BUNDLE_DISPLAY_NAME=FlavorFirebase
ios/Flutter/Profile-dev.xcconfig
#include "dev.xcconfig"
#include "Profile.xcconfig"
ios/Flutter/Profile-prod.xcconfig
#include "prod.xcconfig"
#include "Profile.xcconfig"
#include "staging.xcconfig"
#include "Profile.xcconfig"
ios/Flutter/Release-dev.xcconfig
#include "dev.xcconfig"
#include "Release.xcconfig"
ios/Flutter/Release-prod.xcconfig
#include "prod.xcconfig"
#include "Release.xcconfig"
ios/Flutter/Release-staging.xcconfig
#include "staging.xcconfig"
#include "Release.xcconfig"
ios/Flutter/Release.xcconfig
#include? "Pods/Target Support Files/Pods-Runner/Pods-Runner.release.xcconfig"
#include "Generated.xcconfig"
ios/Flutter/staging.xcconfig
#include "Generated.xcconfig"
FLUTTER_TARGET=lib/main_staging.dart
ASSET_PREFIX=staging
BUNDLE_NAME=FlavorFirebase Staging
BUNDLE_DISPLAY_NAME=FlavorFirebase Staging
flutter runするとエラーが😱
設定ミスったか。。。

PodfileのiOSの最小バージョンを13に設定していなかった!
platform :ios, '13.0'


ENV['COCOAPODS_DISABLE_STATS'] = 'true'

project 'Runner', {
  'Debug' => :debug,
  'Profile' => :release,
  'Release' => :release,
}

def flutter_root
  generated_xcode_build_settings_path = File.expand_path(File.join('..', 'Flutter', 'Generated.xcconfig'), __FILE__)
  unless File.exist?(generated_xcode_build_settings_path)
    raise "#{generated_xcode_build_settings_path} must exist. If you're running pod install manually, make sure flutter pub get is executed first"
  end

  File.foreach(generated_xcode_build_settings_path) do |line|
    matches = line.match(/FLUTTER_ROOT\=(.*)/)
    return matches[1].strip if matches
  end
  raise "FLUTTER_ROOT not found in #{generated_xcode_build_settings_path}. Try deleting Generated.xcconfig, then run flutter pub get"
end

require File.expand_path(File.join('packages', 'flutter_tools', 'bin', 'podhelper'), flutter_root)

flutter_ios_podfile_setup

target 'Runner' do
  use_frameworks!

  flutter_install_all_ios_pods File.dirname(File.realpath(__FILE__))
  target 'RunnerTests' do
    inherit! :search_paths
  end
end

post_install do |installer|
  installer.pods_project.targets.each do |target|
    flutter_additional_ios_build_settings(target)
  end
end
Dev環境でビルドしてみる。
flutter run --flavor dev -t lib/main_dev.dart
Dev環境でビルドできました🙌
Stagingでビルドするがエラーが?
flutter run --flavor staging -t lib/main_staging.dart

修正が必要なようだ。
ios/Flutter/Debug-staging.xcconfig
#include "staging.xcconfig"
#include "Debug.xcconfig"
#include? "Pods/Target Support Files/Pods-Runner/Pods-Runner.debug-staging.xcconfig"
iOSだと環境を切り替えると毎回、pod update, pod installが必要なのか?
cd ios && pod install --repo-update && cd ..
cd ios && pod install && cd ..
flutter clean && flutter pub get && flutter run --flavor staging -t lib/main_staging.dart

表示できた!
Prodは問題なかった?、どうやらStagingの設定をミスしていたようだ。。。
flutter run --flavor prod -t lib/main_prod.dart

こちらがiOSブランチです。この辺は参考にしないと難しそう。
こちらにxconfigがある。
最後に
Flutterのお仕事を続けて、2年ぐらいになりますが自分で環境分けの設定をしたことはあまりなく、iOSをやったのは実は今回が初めてなんですよね😅
いやー結構難しいです。でもSchemeの設定さえ終われば後は必要なxconfigなどのファイルを追加・編集していけば対応できました。
本当は他にもたくさん対応することあるんですけどね。現場だとターミナルを開いて、flutter runするところもあるので、launch.jsonを作成するのが必須ではない場合もあります。
あったほうがいいけどね😅
こちら完成品です。参考までに見てみてください。
Views: 0
