はじめに
Windows環境では、Visual Studioなど特別な開発環境を用意しなくても、標準搭載されている PowerShell 5.x と .NET Framework 4.x を使って簡単にGUIアプリケーションを作ることができる。csc.exe(C#コンパイラ) を使えば、C#のコードを書く必要はあるが EXE化 することも可能。
本記事では、
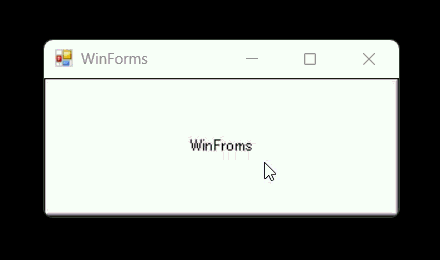
PowerShell + WinForms
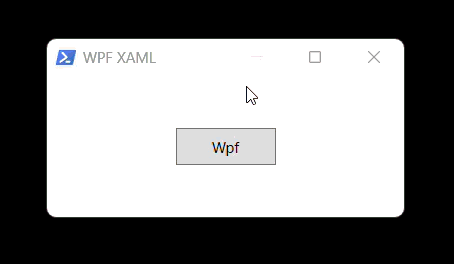
PowerShell + WPF
C#をcsc.exeでコンパイル(WinForms版)
C#をPowerShellでインプロセス実行(Add-Type)
の順で、「Windows標準だけ」で完結するGUI作成方法 を紹介する。
No.
方法
概要
1
PowerShell + WinForms
PowerShellでWinFormsのUIを作成。実装・学習コスト低。デザイン自由度は低。
2
PowerShell + WPF
PowerShellでWPFのUIを作成。高機能レイアウト。XAMLなしでも可。
3
C# csc.exeコンパイル
C#のコードを標準ツールでEXE化。1,2より処理速度に期待できる。ユーザーはダブルクリックで簡単に実行可能。
4
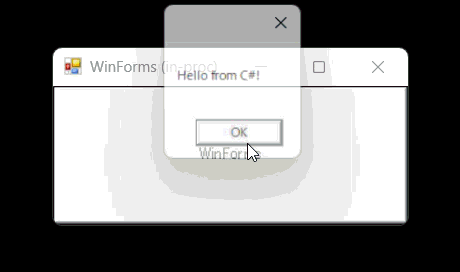
C#をPowerShellでインプロセス実行
C#のコードをPowerShellのプロセス内で実行。1,2より処理速度に期待できる。処理の一部だけC#化することも可能。
最小コード例
Add-Type -AssemblyName System.Windows.Formsが必須。
.Add_Click({ ... })のようにイベントを追加する。
Controls.Add()に追加する順で描画される。
Add-Type - AssemblyName System. Windows. Forms
$form = [Windows.Forms.Form] ::new( )
$form . Text='WinForms' ; $form . Width=300; $form . Height=150
$btn = [Windows.Forms.Button] ::new( )
$btn . Text='WinForms' ; $btn . Dock='Fill'
$btn . Add_Click( { [System.Windows.Forms.MessageBox] ::Show( 'Hello!' ) } )
$form . Controls. Add( $btn )
$form . ShowDialog( ) | Out-Null
2. PowerShell + WPF
Add-Type -AssemblyName PresentationFrameworkが必須。
XAMLは別ファイルにすることも可能。
.Add_Click({ ... })のようにイベントを追加する。
Add-Type - AssemblyName PresentationFramework
[xml] $xaml = @"
/ / schemas. microsoft. com/winfx/2006/xaml/presentation"
Title=" WPF XAML" Width=" 300" Height=" 150">
" Content=" Wpf" Width=" 80" Height=" 30" />
" @
$win = [Windows.Markup.XamlReader] ::Load( ( New-Object System. Xml. XmlNodeReader $xaml ) )
$btn = $win . FindName( "btn" )
$btn . Add_Click( { [System.Windows.MessageBox] ::Show( 'Hello!' ) } )
$win . ShowDialog( ) | Out-Null
3. C#をcsc.exeでコンパイル
Windows標準の C# コンパイラ csc.exe を使用。
以下の例では$srcにC#のコードを記述しているが、別ファイルにすることも可能。
$fx = Join-Path $env :WINDIR 'Microsoft.NET\Framework64\v4.0.30319'
if ( ! ( Test-Path $fx ) ) { $fx = Join-Path $env :WINDIR 'Microsoft.NET\Framework\v4.0.30319' }
$csc = Join-Path $fx 'csc.exe'
$src = @'
using System;
using System.Windows.Forms;
namespace DemoWinForms
{
internal static class Program
{
private static void Main()
{
Application.EnableVisualStyles();
Application.SetCompatibleTextRenderingDefault(false);
var btn = new Button { Text = "WinForms", Dock = DockStyle.Fill };
btn.Click += (s, e) => MessageBox.Show("Hello!");
var form = new Form { Text = "WinForms", Width = 300, Height = 150 };
form.Controls.Add(btn);
Application.Run(form);
}
}
}
' @
$cs = Join-Path $env :TEMP 'demo_winforms.cs'
$exe = Join-Path $PSScriptRoot 'demo_winforms.exe'
$src | Set-Content $cs - Encoding UTF8
& $csc / nologo / target:winexe `
/ r:System. Windows. Forms. dll / r:System. Drawing. dll `
/ out:$exe $cs
4. C# をインプロセス実行(Add-Type)
Add-Type は PowerShellプロセス内でC#コードをその場コンパイルして読み込む コマンドである。配布はps1だけ で済み、処理の重い部分だけC#に寄せて高速化 といった使い方もできる。
Add-Type -TypeDefinition '' -Language CSharp で型を生成(プロセス内にロード)。
必要に応じて -ReferencedAssemblies で参照DLLを追加(WinFormsなら System.Windows.Forms / System.Drawing など)。
生成された型は [名前空間.クラス名]::メソッド() の形で PowerShell から呼べる。
同じ型名を再定義(Add-Type)するとエラーになるため、試行錯誤時は 名前空間/クラス名を変える か、セッションを再起動 する。
https://learn.microsoft.com/powershell/module/microsoft.powershell.utility/add-type
Add-Type - ReferencedAssemblies System. Windows. Forms, System. Drawing - TypeDefinition @'
using System;
using System.Windows.Forms;
namespace Demo
{
public static class UI
{
public static void ShowForm()
{
var form = new Form { Text = "WinForms (in-proc)", Width = 300, Height = 150 };
var btn = new Button { Text = "WinForms", Dock = DockStyle.Fill };
btn.Click += (s, e) => MessageBox.Show("Hello from C#!");
form.Controls.Add(btn);
form.ShowDialog();
}
}
}
' @ - Language CSharp
[Demo.UI] ::ShowForm( )
実践例
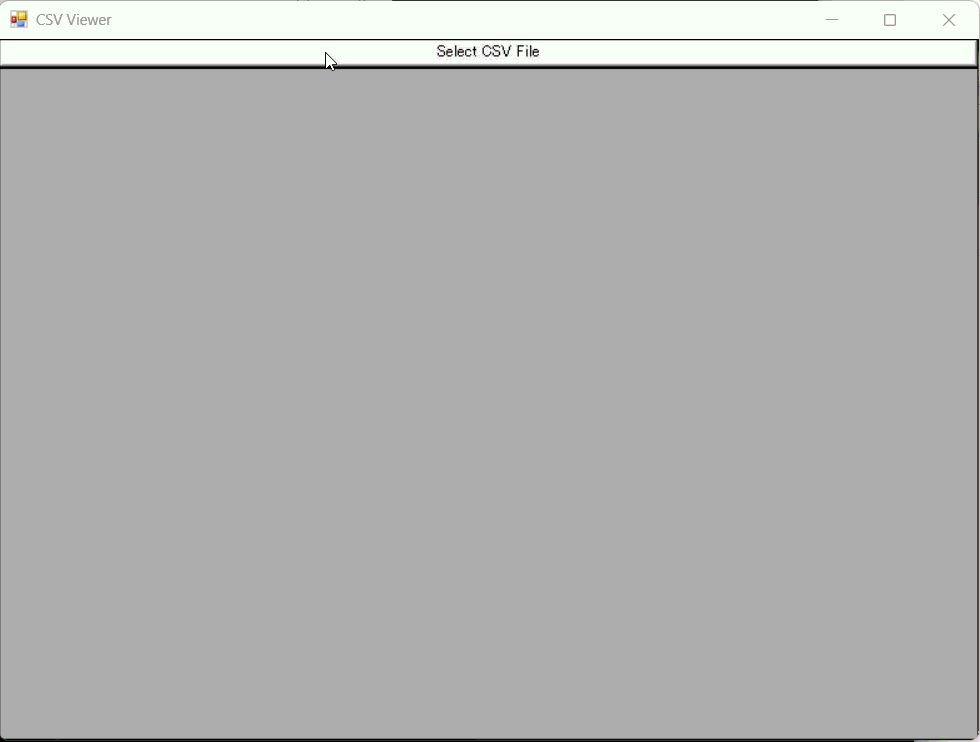
(1)CSVを読込んで一覧表示
PowerShell + WinFormsの場合と、PowerShell + WPFの場合で下記の機能を実装する。
ボタンクリックでファイル選択ダイアログをオープン
CSVファイルを選択すると一覧表示
読み込んだCSVをDataTableに変換し、WinFormsのDataGridViewにバインド。
Add-Type - AssemblyName System. Windows. Forms
class CsvHelper {
[string[]] ReadCsv( $filePath ) {
if ( -Not ( Test-Path $filePath ) ) {
throw "File not found: $filePath "
}
return Get-Content $filePath
}
[System.Data.DataTable] ConvertToDataTable( $csvData ) {
$dataTable = [System.Data.DataTable] ::new( )
if ( $csvData . Length -gt 0) {
$headers = $csvData [ 0] . Split( ',' )
foreach ( $header in $headers ) {
$dataTable . Columns. Add( $header )
}
for ( $i = 1; $i -lt $csvData . Length; $i ++ ) {
$row = $dataTable . NewRow( )
$values = $csvData [ $i ] . Split( ',' )
for ( $j = 0; $j -lt $values . Length; $j ++ ) {
$row [ $j ] = $values [ $j ]
}
$dataTable . Rows. Add( $row )
}
}
return $dataTable
}
}
$form = [System.Windows.Forms.Form] ::new( )
$form . Text = "CSV Viewer"
$form . Size = [System.Drawing.Size] ::new( 800, 600)
$dataGridView = [System.Windows.Forms.DataGridView] ::new( )
$dataGridView . Dock = 'Fill'
$dataGridView . AutoSizeColumnsMode = 'Fill'
$button = [System.Windows.Forms.Button] ::new( )
$button . Text = "Select CSV File"
$button . Dock = 'Top'
$button . Add_Click( {
$openFileDialog = [System.Windows.Forms.OpenFileDialog] ::new( )
$openFileDialog . Filter = "CSV Files (*.csv)|*.csv|All Files (*.*)|*.*"
$openFileDialog . Title = "Select a CSV File"
if ( $openFileDialog . ShowDialog( ) -eq [System.Windows.Forms.DialogResult] ::OK) {
$csvHelper = [CsvHelper] ::new( )
$csvData = $csvHelper . ReadCsv( $openFileDialog . FileName)
$dataTable = $csvHelper . ConvertToDataTable( $csvData )
$dataGridView . DataSource = $dataTable
}
} )
$form . Controls. Add( $dataGridView )
$form . Controls. Add( $button )
$form . Add_Shown( { $form . Activate( ) } )
[void] $form . ShowDialog( )
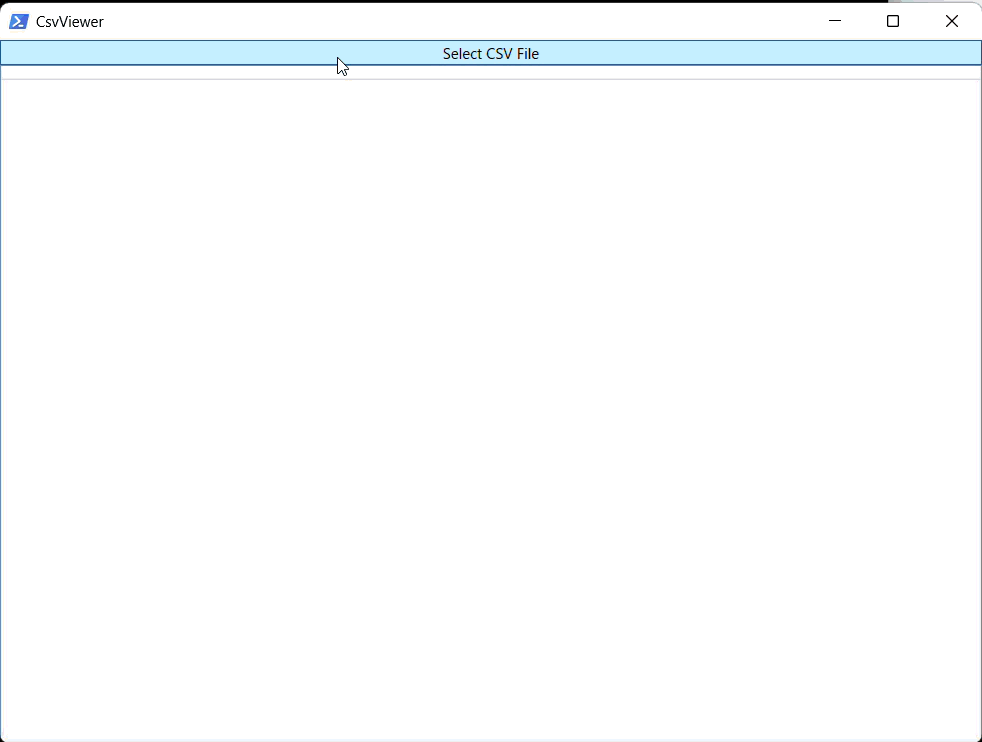
PowerShell + WPFの場合
読み込んだCSVをDataTableに変換し、WPFのDataGridにバインド。
Add-Type - AssemblyName PresentationFramework
class CsvHelper {
[string[]] ReadCsv( $filePath ) {
if ( -Not ( Test-Path $filePath ) ) {
throw "File not found: $filePath "
}
return Get-Content $filePath
}
[System.Data.DataTable] ConvertToDataTable( $csvData ) {
$dataTable = [System.Data.DataTable] ::new( )
if ( $csvData . Length -gt 0) {
$headers = $csvData [ 0] . Split( ',' )
foreach ( $header in $headers ) {
$dataTable . Columns. Add( $header )
}
for ( $i = 1; $i -lt $csvData . Length; $i ++ ) {
$row = $dataTable . NewRow( )
$values = $csvData [ $i ] . Split( ',' )
for ( $j = 0; $j -lt $values . Length; $j ++ ) {
$row [ $j ] = $values [ $j ]
}
$dataTable . Rows. Add( $row )
}
}
return $dataTable
}
}
[xml] $xaml = @"
/ / schemas. microsoft. com/winfx/2006/xaml/presentation"
xmlns:x=" http:/ / schemas. microsoft. com/winfx/2006/xaml"
Title=" CsvViewer" Width=" 800" Height=" 600">
"/>
* "/>
" Grid.Row=" 0" Content=" Select CSV File" Margin=" 0, 0, 0, 0"/>
" Grid.Row=" 1" AutoGenerateColumns=" True" />
" @
$reader = ( [System.Xml.XmlNodeReader] ::new( $xaml ) )
$window = [Windows.Markup.XamlReader] ::Load( $reader )
$selectCsvButton = $window . FindName( "selectCsvButton" )
$dataGrid = $window . FindName( "dataGrid" )
$selectCsvButton . Add_Click( {
$openFileDialog = [Microsoft.Win32.OpenFileDialog] ::new( )
$openFileDialog . Filter = "CSV Files (*.csv)|*.csv|All Files (*.*)|*.*"
$openFileDialog . Title = "Select a CSV File"
if ( $openFileDialog . ShowDialog( ) -eq $true ) {
$csvHelper = [CsvHelper] ::new( )
$csvData = $csvHelper . ReadCsv( $openFileDialog . FileName)
$dataTable = $csvHelper . ConvertToDataTable( $csvData )
$dataGrid . ItemsSource = $dataTable . DefaultView
}
} )
$window . ShowDialog( ) | Out-Null
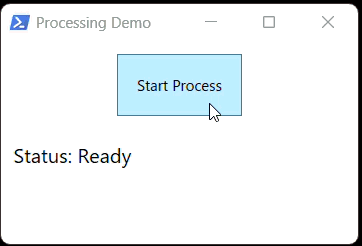
(2)PowerShellで一部の処理をC#化
下記のサンプルはベースはPowerShellで一部の重い処理だけC#化するサンプル。
PowerShellで実装した処理をAction型でC#に渡し、C#内でコールバック実行することも可能。下記のサンプルではUI更新のPowerShell処理をC#に渡し、C#コード内で実行している。
Add-Type - AssemblyName PresentationFramework, PresentationCore, WindowsBase
Add-Type - TypeDefinition @"
using System;
using System.Threading;
using System.Threading.Tasks;
using System.Windows.Threading;
public class Processor
{
public Task StartProcessingAsync(Action updateStatus, Dispatcher dispatcher)
{
return Task.Run(() => {
try {
// 処理タスクの定義
var tasks = new[] {
new { TaskNo = 1, Duration = 1000 },
new { TaskNo = 2, Duration = 2000 },
new { TaskNo = 3, Duration = 1500 },
new { TaskNo = 4, Duration = 1000 }
};
// 処理開始の通知
// Task.Runはバックグラウンドスレッドで実行されるため、
// Dispatcherを使用してUIスレッドに通知する必要がある
dispatcher.Invoke(() => updateStatus(" Starting Processing. . . "));
for (int i = 0; i {
// 進捗の計算
double progress = (double)(i + 1) / tasks.Length * 100;
updateStatus(string.Format(" Processing. . . ( { 0:0. 0} % ) ", progress));
});
}
// 全てのタスクが完了したことを通知
dispatcher.Invoke(() => updateStatus(" Processing complete!"));
}
catch (Exception ex)
{
dispatcher.Invoke(() => updateStatus(" Error: " + ex.Message));
}
});
}
}
" @ - ReferencedAssemblies @( "WindowsBase" )
[xml] $xaml = @"
/ / schemas. microsoft. com/winfx/2006/xaml/presentation"
xmlns:x=" http:/ / schemas. microsoft. com/winfx/2006/xaml"
Title=" Processing Demo" Height=" 200" Width=" 300">
" Width=" 100" Height=" 50" Margin=" 10">Start Process
" FontSize=" 16" Margin=" 10">Status: Ready
" @
$reader = New-Object System. Xml. XmlNodeReader $xaml
$window = [Windows.Markup.XamlReader] ::Load( $reader )
$processButton = $window . FindName( "ProcessButton" )
$statusText = $window . FindName( "StatusText" )
$processor = New-Object Processor
$processButton . Add_Click( {
$processButton . IsEnabled = $false
$updateStatusAction = [Action[string]] {
param ( $status )
$statusText . Text = "Status: $status "
}
$task = $processor . StartProcessingAsync( $updateStatusAction , $window . Dispatcher)
$task . ContinueWith( {
$processButton . IsEnabled = $true
} , [System.Threading.Tasks.TaskScheduler] ::FromCurrentSynchronizationContext( ) )
} )
$window . ShowDialog( ) | Out-Null
【補足】csc.exe / PowerShell Add-Type の C# & .NET バージョンについて
1. csc.exe (C# コンパイラ)
公式 : csc.exe (C# Compiler)
概要 : Windows に同梱される C# コンパイラ。
.NET Framework
C# バージョン
2.0 / 3.0
C# 2.0
3.5
C# 3.0
4.0
C# 4.0
4.5 / 4.6
C# 5.0
4.6.2 / 4.7
C# 6.0
4.7.2 / 4.8
C# 7.0 / 7.3
csc -version で手元のコンパイラのバージョンを確認可能。
2. PowerShell Add-Type
PowerShell
実行基盤
利用される C# コンパイラ
C# バージョン目安
5.1
.NET Framework 4.x
csc.exe (Framework 付属)
7.0 / 7.3
PowerShell 5.1 の Add-Type は「.NET Framework 4.8 + C# 7.3」まで。
3. バージョン確認コマンド例
& ( Get-Command csc. exe) . Source - version
Add-Type - TypeDefinition "public class V { }"
[Microsoft.CSharp.CSharpCodeProvider] . Assembly. GetName( ) . Version