
こんにちは👋
2025年7月16日、AWSからAmazon Bedrock AgentCoreと呼ばれるサービスがプレビュー公開されました。
元々AWSには、Agents for Amazon Bedrockと呼ばれるAIエージェントを構築できる機能があったのですが、Amazon Bedrock AgentCoreの登場により、AIエージェントをAWS上で構築するための機能がさらに強化されました(ちょっと名前がややこしいですね)。

具体的には以下のような機能がプレビュー公開されています。
-
Agent Runtime
- オープンソースのエージェントフレームワーク(LangGraph、Strands Agentsなど)をマネージドにホストできるエージェントランタイムを提供する機能です。ECRにビルドしたイメージを配置して実行します。
-
Agent Built-in Tool
- Code InterpreterやBrowser UseなどAIエージェントで一般的に利用されるツール機能をマネージドに提供する機能です。
-
Agent Memory
- AIエージェントに長期記憶を付与するマネージドなメモリを提供する機能。メモリのコンテキスト圧縮や意味抽出などのメモリと併用されがちな機能もサポートしています。
-
Agent Gateway
- AIエージェントが利用する外部ツールを統合したゲートウェイをマネージドに管理・利用できる機能です。既存のAPI・Lambdaなどを単一のMCPサーバとして活用することができます。
本記事では、Amazon Bedrock AgentCoreの機能の中でも、Built-in ToolsのCode Interpreterに焦点を当てて紹介したいと思います。
(発表されてから急いで書いたので、内容が間違ってたらごめんなさい🙇♂️)
Amazon Bedrock AgentCoreにおけるCode Interpreter
Code Interpreterとは、生成AIが作成したコードをセキュアに利用できる実行環境を提供する機能、あるいはそれを利用してコードの実行結果を返す機能を指します。
もちろん生成AIが作成したコードをローカルで実行させることもできますが「セキュアに」というのがネックで、ローカル環境に悪影響を与えるコード(重要なディレクトリを削除したり)や不正な外部への通信などを抑制する必要がありました。
生成AIの黎明期(2022年頃)から、生成AIにコードを生成から実行までさせたい!!…という動きはあり、AWSでは以下のような手段で実現されていました。
- 生成AIが作成したコードを載せたLambdaを毎回作成して実行
- Pistonと呼ばれるセキュアなコード実行環境をセルフホストして実行
いずれも「簡単に利用できます!!」とは言いづらく、Code Interpreterのセットアップから利用まで大きなハードルがありました…
そんな状況で希望の光として指してきたのが、2024年のAgents for Amazon BedrockのCode Interpreter機能の登場です。
こちらはAgentsを作成する際に、追加でCode Interpreterの有効化設定を行うだけで、簡単にCode Interpreter機能を利用できるという画期的なものでした。
しかしながら、Code Interpreter機能を利用できるのは、Agents for Amazon Bedrockで作成したエージェントだけという制約があり、LangChainやMastraなどの有名なオープンソースのAIフレームワークと統合したり、ローカルの開発環境から手軽に試したりするには難しいものがありました…
そこで、ようやく今回の「AgentCore Code Interpreter」の出番です!
前まではBedrockでAgentsを作らないと利用できなかったCode Interpreterですが、AgentCoreではCode Interpreter機能のみを単体として利用できます!
つまり、AIエージェント本体の機能は別のフレームワークに分離しておき、AWS上のセキュアかつマネージドな環境でCode Interpreterのみを利用するといった使い方ができるということです。
もちろん同じく発表されたAgent Runtimeと組み合わせて使うこともできるので、AIエージェントの構築にあたって、より柔軟な選択肢が取れるようになったのが非常に嬉しいポイントです。
Mastraで試してみよう!
今回は、有名なAIエージェントフレームワークであるMastraを使用して、分離された環境でAgentCoreのCode Interpreterをお手軽に試してみる!というのをやってみようと思います。
AWSアカウントをお持ちの方であれば、誰でもすぐに実行できるサンプルリポジトリも用意してあるので、気になる方は参考にしてみてください。
MastraだとWeb UIが付いてきて便利なので、個人的な推しフレームワークです。
Mastraの詳しい説明や使い方については、他の方の記事を参考にしてみてください。
まずは、Mastraプロジェクトを新たに作成して、AI SDK(Bedrock)やAWS SDK for JavaScriptなどを追加していきます。
npm i @ai-sdk/amazon-bedrock @aws-sdk/client-bedrock-agentcore
AgentCore Code Interpreterのもう一つの大きな利点として、なんとAWS上でのコンソール操作が不要です!Code InterpreterやBrower UseなどのBuilt-in Toolsは適切な権限を持つアクセスキーさえあれば誰でも実行できます。
なので、以下のコードをペタペタ貼り付けるだけで、簡単にCode Interpreterを使ってくれるAIエージェントを構築できます。
まずは、Code Interpreterを使うためのツールを作りましょう。
src/mastra/tools/code-interpreter-tools.ts
import {
  BedrockAgentCoreClient,
  InvokeCodeInterpreterCommand,
  StartCodeInterpreterSessionCommand,
  StopCodeInterpreterSessionCommand,
} from "@aws-sdk/client-bedrock-agentcore";
import { createTool } from "@mastra/core";
import { z } from "zod";

const bedrockAgentCoreClient = new BedrockAgentCoreClient({
  region: "us-east-1",
  credentials: {
    accessKeyId: process.env.AWS_ACCESS_KEY_ID!,
    secretAccessKey: process.env.AWS_SECRET_ACCESS_KEY!,
  },
});

export const codeInterpreterTool = createTool({
  id: "use-code-interpreter",
  description: "Execute Python code using a Code Interpreter",
  inputSchema: z.object({
    code: z.string().describe("Python code that you want to execute"),
  }),
  outputSchema: z.object({
    output: z.string(),
  }),
  execute: async ({ context }) => {
    const startSessionResponse = await bedrockAgentCoreClient.send(
      new StartCodeInterpreterSessionCommand({
        codeInterpreterIdentifier: "aws.codeinterpreter.v1",
        name: "mastra-session",
        sessionTimeoutSeconds: 900,
      }),
    );
    const sessionId = startSessionResponse.sessionId;

    const invokeResponse = await bedrockAgentCoreClient.send(
      new InvokeCodeInterpreterCommand({
        codeInterpreterIdentifier: "aws.codeinterpreter.v1",
        sessionId: sessionId,
        name: "executeCode",
        arguments: {
          language: "python",
          code: context.code,
        },
      }),
    );

    let output = "";
    for await (const event of invokeResponse.stream!) {
      const contents = event.result!.content!;
      for (const contentItem of contents) {
        if (contentItem.type === "text") {
          output = contentItem.text!;
        }
      }
    }

    await bedrockAgentCoreClient.send(
      new StopCodeInterpreterSessionCommand({
        codeInterpreterIdentifier: "aws.codeinterpreter.v1",
        sessionId: sessionId,
      }),
    );

    return { output };
  },
});
AWSのアクセスキー以外、AWSアカウントによって動的に変化する値がないことが分かるかと思います。コードもスッキリ書けるので非常に便利です。
また、Code InterpreterなどのBuilt-in Toolにはセッションという概念があり、Code Interpreterを利用する前にセッションを作成して、その中でコードの実行をリクエストするという形になります。
このセッションが開かれている間のみ時間単位で課金されると思うのですが、コード内で閉じ忘れてもAWSコンソール上からセッションを閉じることができるので安心です。
AgentCore関連の詳しい料金体系は、こちらにまとめてくださっているので見てみてください。
次に、先ほど作成したツールを利用するAIエージェントを作成しましょう。
src/mastra/agents/code-interpreter-agent.ts
import { createAmazonBedrock } from "@ai-sdk/amazon-bedrock";
import { Agent } from "@mastra/core/agent";
import { codeInterpreterTool } from "../tools/code-interpreter-tool";

const bedrock = createAmazonBedrock({
  region: "us-east-1",
  accessKeyId: process.env.AWS_ACCESS_KEY_ID,
  secretAccessKey: process.env.AWS_SECRET_ACCESS_KEY,
});

export const codeInterpreterAgent = new Agent({
  name: "Code Interpreter Agent",
  instructions: `
    You are an excellent assistant who helps users by executing Python code to fulfill their requests.

    - Write appropriate Python code to accomplish the user's request. You can use commonly available libraries (numpy, pandas, etc.).
    - Pass the program code you want to execute to the Code Interpreter and generate responses based on the results.
    - Since the Code Interpreter's response consists of standard output content, generate code that includes print statements so you can verify the responses.
  `,
  model: bedrock("us.anthropic.claude-sonnet-4-20250514-v1:0"),
  tools: { codeInterpreterTool },
});
こちらはAI SDKのBedrock(Claude Sonnet 4)を利用して、AIエージェントを構成します。
たくさんBedrockという名前があって、とてもややこしいですね笑。
そして、作成したAIエージェントをMastraのインスタンスにも登録してあげます。
今回はどんなコードを実行したのかも綺麗にトレースしたいので、LangFuseと連携できるように設定しておきます。
src/mastra/index.ts
import { ConsoleLogger } from "@mastra/core/logger";
import { Mastra } from "@mastra/core/mastra";
import { LangfuseExporter } from "langfuse-vercel";

import { codeInterpreterAgent } from "./agents/code-interpreter-agent";

export const mastra = new Mastra({
  agents: { codeInterpreterAgent },
  logger: new ConsoleLogger({
    name: "mastra",
    level: "info",
  }),
  telemetry: {
    serviceName: "ai",
    enabled: true,
    export: {
      type: "custom",
      exporter: new LangfuseExporter({
        baseUrl: process.env.LANGFUSE_BASEURL,
        publicKey: process.env.LANGFUSE_PUBLIC_KEY,
        secretKey: process.env.LANGFUSE_SECRET_KEY,
      }),
    },
  },
});
まずは、Code Interpreterを起動するツールを単体で試してみましょう。
Toolsの画面から、先ほど作成したツールを選択して、任意のPythonコードを書いて送ってみます。
今回はシンプルに「Hello, World!!」を出力させてみましょう。
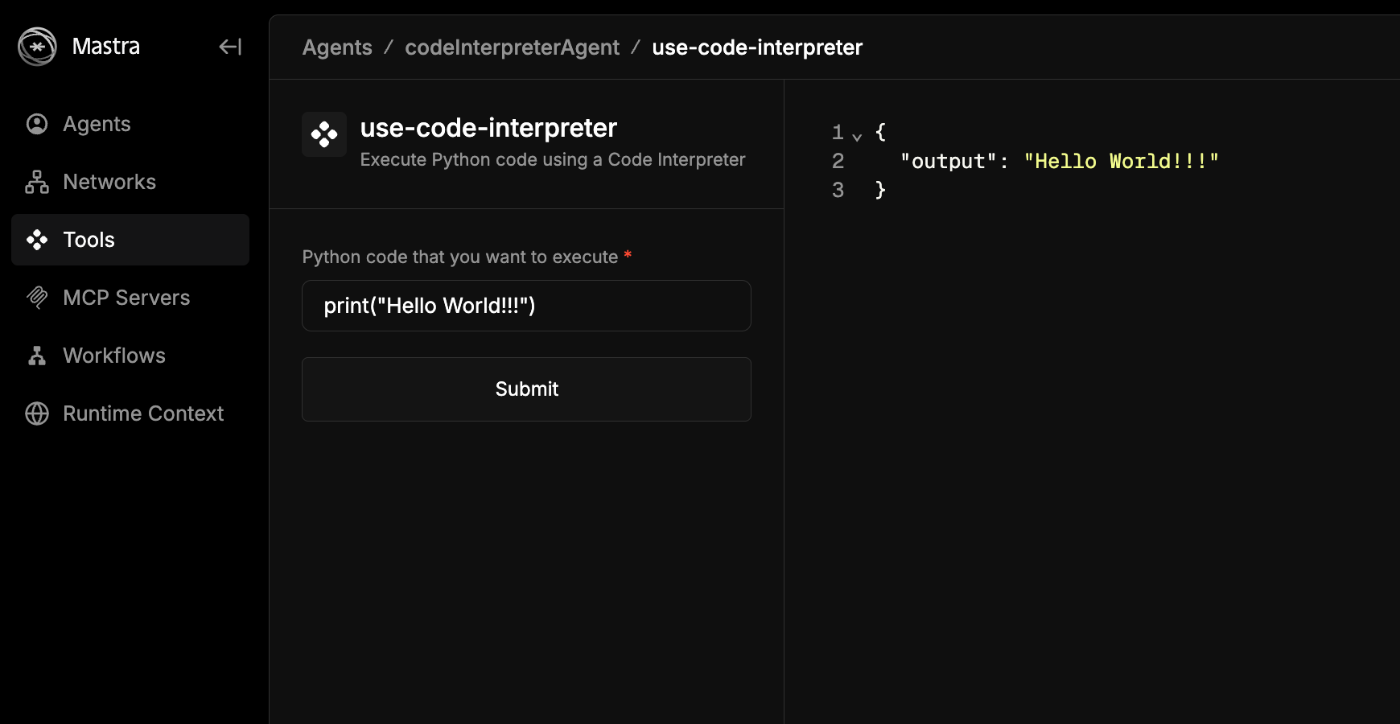
ちゃんとコードを実際に実行した結果が出力されていますね。
AgentCore – Built-in Toolsのマネジメントコンソールからも、セッションを起動した形跡を確認することができます。

次に、エージェントの画面から確認してみましょう。
AgentCore Code Interpreterで使えるPythonのライブラリが気になりますね。
それをそのままAIエージェントにリクエストしてみましょう。

何やらCode Interpreterに対して色々とコードの実行をリクエストした後、最終的に以下のようなレポートっぽいものを出力してくれました。
# 📦 Code Interpreterで利用可能なパッケージまとめ

**環境情報:**
- Python 3.10.16
- 総パッケージ数: **263個**

### 🌟 主要な利用可能パッケージ

**📊 データサイエンス・分析:**
- ✅ NumPy (1.26.4) - 数値計算
- ✅ Pandas (1.5.3) - データ分析
- ✅ SciPy (1.13.1) - 科学計算
- ✅ SymPy (1.12.1) - 数式処理

**📈 データ可視化:**
- ✅ Matplotlib (3.9.0) - グラフ作成
- ✅ Plotly (5.22.0) - インタラクティブグラフ
- ✅ Bokeh (2.4.3) - Web向け可視化

**🤖 機械学習:**
- ✅ Scikit-learn (1.5.0) - 機械学習ライブラリ
- ✅ PyTorch (2.3.0) - ディープラーニング
- ✅ XGBoost (2.0.3) - 勾配ブースティング

**🖼️ 画像処理:**
- ✅ OpenCV (4.10.0.82) - コンピュータビジョン
- ✅ Pillow (10.3.0) - 画像処理
- ✅ ImageIO (2.34.1) - 画像入出力

**🌐 Web・API:**
- ✅ Requests (2.32.4) - HTTP通信
- ✅ Flask (3.0.3) - Webフレームワーク
- ✅ Django (5.0.6) - Webフレームワーク
- ✅ FastAPI (0.111.0) - API開発

**📄 データ処理:**
- ✅ BeautifulSoup4 (4.12.3) - HTML/XML解析
- ✅ lxml (5.2.2) - XML処理
- ✅ OpenPyXL (3.1.3) - Excel操作
- ✅ PyYAML (6.0.1) - YAML処理

**🔤 自然言語処理:**
- ✅ NLTK (3.8.1) - 自然言語処理
- ✅ spaCy (3.7.4) - 高性能NLP

**🗄️ データベース:**
- ✅ PyMongo (4.7.2) - MongoDB接続

### ❌ 利用できない主要パッケージ
- TensorFlow/Keras
- Seaborn
- Jupyter Notebook
- Streamlit
- Dash

## まとめ

このCode Interpreter環境では、データサイエンス、機械学習、Web開発に必要な主要なパッケージがほぼ揃っているので、様々なタスクに対応できますね!🎉
めちゃくちゃたくさんのライブラリが同梱されてますね。
必要なライブラリがなくてコードが実行できない!ということは、余程ニッチな作業に使おうとしない限り発生しなさそうです。
副産物: Code Interpreterで使えるライブラリ一覧
=== Python環境情報 ===
Python バージョン: 3.10.16 (main, Jul 10 2025, 21:12:52) [GCC 11.3.1 20221121 (Red Hat 11.3.1-4)]
Python 実行パス: /opt/amazon/genesis1p-tools/venv/bin/python-original

=== インストール済みパッケージ一覧 ===
総パッケージ数: 263

absl-py == 2.1.0
aiohappyeyeballs == 2.3.5
aiohttp == 3.11.11
aiosignal == 1.3.1
alabaster == 0.7.10
annotated-types == 0.7.0
anyio == 4.9.0
asgiref == 3.8.1
astor == 0.8.1
asttokens == 2.4.1
async-timeout == 4.0.3
attrs == 23.2.0
babel == 2.17.0
backcall == 0.1.0
backoff == 2.2.1
bcrypt == 4.1.3
beautifulsoup4 == 4.12.3
blinker == 1.8.2
blis == 0.7.11
bokeh == 2.4.3
branca == 0.7.2
BrazilPython-pytest == 3.x
BrazilPython-Pytest-Guard == 2.x
BrazilPythonTestSupport == 3.0
cachetools == 5.3.3
catalogue == 2.0.10
certifi == 2024.6.2
cffi == 1.16.0
chardet == 5.2.0
charset-normalizer == 3.3.2
click == 8.1.7
click-plugins == 1.1.1
cloudpathlib == 0.16.0
cloudpickle == 3.0.0
colorama == 0.4.6
comm == 0.2.2
confection == 0.1.5
contourpy == 1.2.1
coverage == 7.2.7
cryptography == 40.0.2
cssselect2 == 0.7.0
cycler == 0.12.1
cymem == 2.0.8
debugpy == 1.8.1
decorator == 4.4.2
distro == 1.9.0
Django == 5.0.6
dnspython == 2.6.1
docutils == 0.18.1
docx2txt == 0.8
duckdb == 0.8.1
email-validator == 2.1.1
entrypoints == 0.4
et-xmlfile == 1.1.0
exceptiongroup == 1.3.0
execnet == 2.1.1
executing == 2.0.1
Faker == 19.13.0
fastapi == 0.111.0
ffmpeg-python == 0.2.0
ffmpy == 0.3.2
filelock == 3.14.0
flask == 3.0.3
Flask-Cors == 4.0.1
Flask-Login == 0.6.3
fonttools == 4.53.0
fpdf == 1.7.2
frozenlist == 1.4.1
fsspec == 2024.5.0
future == 1.0.0
genesis-1p-tools-rpm-bundle == 1.0.0
greenlet == 3.0.3
gTTS == 2.5.1
gunicorn == 22.0.0
h11 == 0.14.0
h2 == 4.1.0
hpack == 4.0.0
httpcore == 1.0.7
httptools == 0.6.1
httpx == 0.28.1
httpx-sse == 0.4.0
hypercorn == 0.17.3
hyperframe == 6.0.1
idna == 3.7
imageio == 2.34.1
imageio-ffmpeg == 0.5.1
imagesize == 1.4.1
imgkit == 1.2.3
importlib-metadata == 7.1.0
importlib-resources == 6.4.0
iniconfig == 0.0.0
ipykernel == 6.29.5
ipython == 8.25.0
itsdangerous == 2.2.0
jedi == 0.19.1
jinja2 == 3.1.4
joblib == 1.4.2
jupyter-client == 8.6.0
jupyter-core == 5.7.1
kiwisolver == 1.4.5
langcodes == 3.4.0
language-data == 1.2.0
lazy-loader == 0.4
loguru == 0.7.2
lxml == 5.2.2
marisa-trie == 1.1.1
markdown-it-py == 3.0.0
markdown2 == 2.4.13
markdownify == 0.12.1
MarkupSafe == 2.1.5
matplotlib == 3.9.0
matplotlib-inline == 0.1.7
matplotlib-venn == 0.11.10
mcp == 1.9.2
mdurl == 0.1.2
mizani == 0.9.3
moviepy == 1.0.3
mpmath == 1.3.0
multidict == 6.0.5
multipart == 1.2.1
murmurhash == 1.0.10
mutagen == 1.47.0
nest-asyncio == 1.5.6
networkx == 3.3
nltk == 3.8.1
numexpr == 2.10.0
numpy == 1.26.4
openai == 1.33.0
opencv-python == 4.10.0.82
openpyxl == 3.1.3
orjson == 3.10.3
packaging == 24.0
pandas == 1.5.3
parso == 0.8.4
patsy == 0.5.6
pdf2image == 1.17.0
pdfkit == 1.0.0
pdfminer.six == 20231228
pdfplumber == 0.11.0
pdfrw == 0.4
pexpect == 4.9.0
pickleshare == 0.7.5
pillow == 10.3.0
pip == 25.1.1
platformdirs == 4.2.2
plotly == 5.22.0
pluggy == 0.13.0
preshed == 3.0.9
priority == 2.0.0
proglog == 0.1.10
prompt-toolkit == 3.0.45
propcache == 0.2.1
psutil == 5.9.5
psycopg2-binary == 2.9.9
ptyprocess == 0.7.0
pure-eval == 0.2.2
py == 1.11.0
pycparser == 2.22
pydantic == 2.10.5
pydantic-core == 2.27.2
pydantic-settings == 2.7.1
pydub == 0.25.1
pygments == 2.18.0
pymongo == 4.7.2
PyNaCl == 1.5.0
pyOpenSSL == 23.2.0
pyparsing == 3.1.2
pypdf2 == 3.0.1
pypdfium2 == 4.30.0
pypng == 0.20220715.0
pyshp == 2.3.1
pytest == 6.2.5
pytest-asyncio == 0.20.3
pytest-cov == 4.0.0
pytest-html == 1.17.0
pytest-metadata == 1.7.0
pytest-xdist == 2.5.0
Python-amazon-doc-utils == 1.0
python-dateutil == 2.9.0.post0
python-docx == 1.1.2
python-dotenv == 1.0.1
python-multipart == 0.0.9
pytz == 2024.1
pywavelets == 1.6.0
pyxlsb == 1.0.10
PyYAML == 6.0.1
pyzbar == 0.1.9
pyzmq == 25.1.2
qrcode == 7.4.2
rarfile == 4.2
redis == 5.0.4
regex == 2024.5.15
reportlab == 4.2.0
requests == 2.32.4
retrying == 1.3.4
rich == 13.7.1
scikit-image == 0.23.2
scikit-learn == 1.5.0
scipy == 1.13.1
setuptools == 65.5.0
shapely == 2.0.4
shellingham == 1.5.4
six == 1.16.0
smart-open == 6.4.0
sniffio == 1.3.1
snowballstemmer == 2.2.0
soupsieve == 2.5
spacy == 3.7.4
spacy-legacy == 3.0.12
spacy-loggers == 1.0.5
sphinx == 7.1.2
sphinxcontrib-applehelp == 1.0.1
sphinxcontrib-devhelp == 1.0.1
sphinxcontrib-htmlhelp == 2.0.0
sphinxcontrib-jsmath == 1.0.1
sphinxcontrib-qthelp == 1.0.2
sphinxcontrib-serializinghtml == 1.1.5
SQLAlchemy == 1.4.52
sqlparse == 0.5.0
srsly == 2.4.8
sse-starlette == 2.3.4
stack-data == 0.6.3
starlette == 0.47.1
statsmodels == 0.14.2
svglib == 1.5.1
svgwrite == 1.4.3
sympy == 1.12.1
tenacity == 8.3.0
textblob == 0.18.0.post0
thinc == 8.2.3
threadpoolctl == 3.5.0
tifffile == 2024.5.22
tinycss2 == 1.3.0
toml == 0.10.2
tomli == 2.1.0
torch == 2.3.0
torchaudio == 2.3.0
torchvision == 0.18.0
tornado == 6.4
tqdm == 4.66.4
traitlets == 5.14.3
typer == 0.9.4
typing-extensions == 4.12.1
tzdata == 2024.1
ujson == 5.10.0
urllib3 == 1.26.19
uvicorn == 0.30.1
uvloop == 0.19.0
Wand == 0.6.13
wasabi == 1.1.3
watchfiles == 0.22.0
wcwidth == 0.2.13
weasel == 0.3.4
webencodings == 0.5.1
werkzeug == 3.0.3
wsproto == 1.2.0
xgboost == 2.0.3
xlrd == 2.0.1
XlsxWriter == 3.2.0
xml-python == 0.4.3
xyzservices == 2024.4.0
yarl == 1.9.4
zipp == 3.21.0"
LangFuseのトレースを見て、具体的にどのようなコードが実行されたのかも見てみましょう。
(何回か実行した結果でいい感じのものをペタペタ貼ってます)


生成AI自身が考えてPythonのコードを生成し、Code Interpreterのツールを使ってAWS環境でのコード実行までできていますね。
途中でエラーが発生したりもしていますが、そのエラー結果の内容からフィードバックを行い、軌道修正して最終的な応答を得ることができています!
Amazon Bedrock AgentCoreの登場によって、AWSでより手軽にCode Interpreterを利用することができるようになりました!
セキュアな環境でのコード実行ができることにより、生成AIが苦手な計算タスクやデータ分析タスクなどの様々な業務に活用することができるようになります!気になる方はぜひ触ってみてください。
Views: 1
